

Jim Krause | Classes | P351 Video Field & Post Production
Week 2
Misc. Announcements
- Lab this week: We'll review cameras, workflow & continuity- and then carry out the Storyboard/Continuity Exercise. BRING IN A STORYBOARD (and upload it to Canvas). BE SURE TO HANG ONTO YOUR MEDIA. We might use it to learn Media Composer or some other editing software in the next week or two. (We'll re-edit your Storyboard/Continuity projects with other software).
- Your Art Video and Interview/Feature Story ideas are due in two weeks. Now is the time to start deciding on an idea for your art video and to find someone to interview for the Interview/Feature story.
- Consider taking on a project for a real-world client.
Readings:
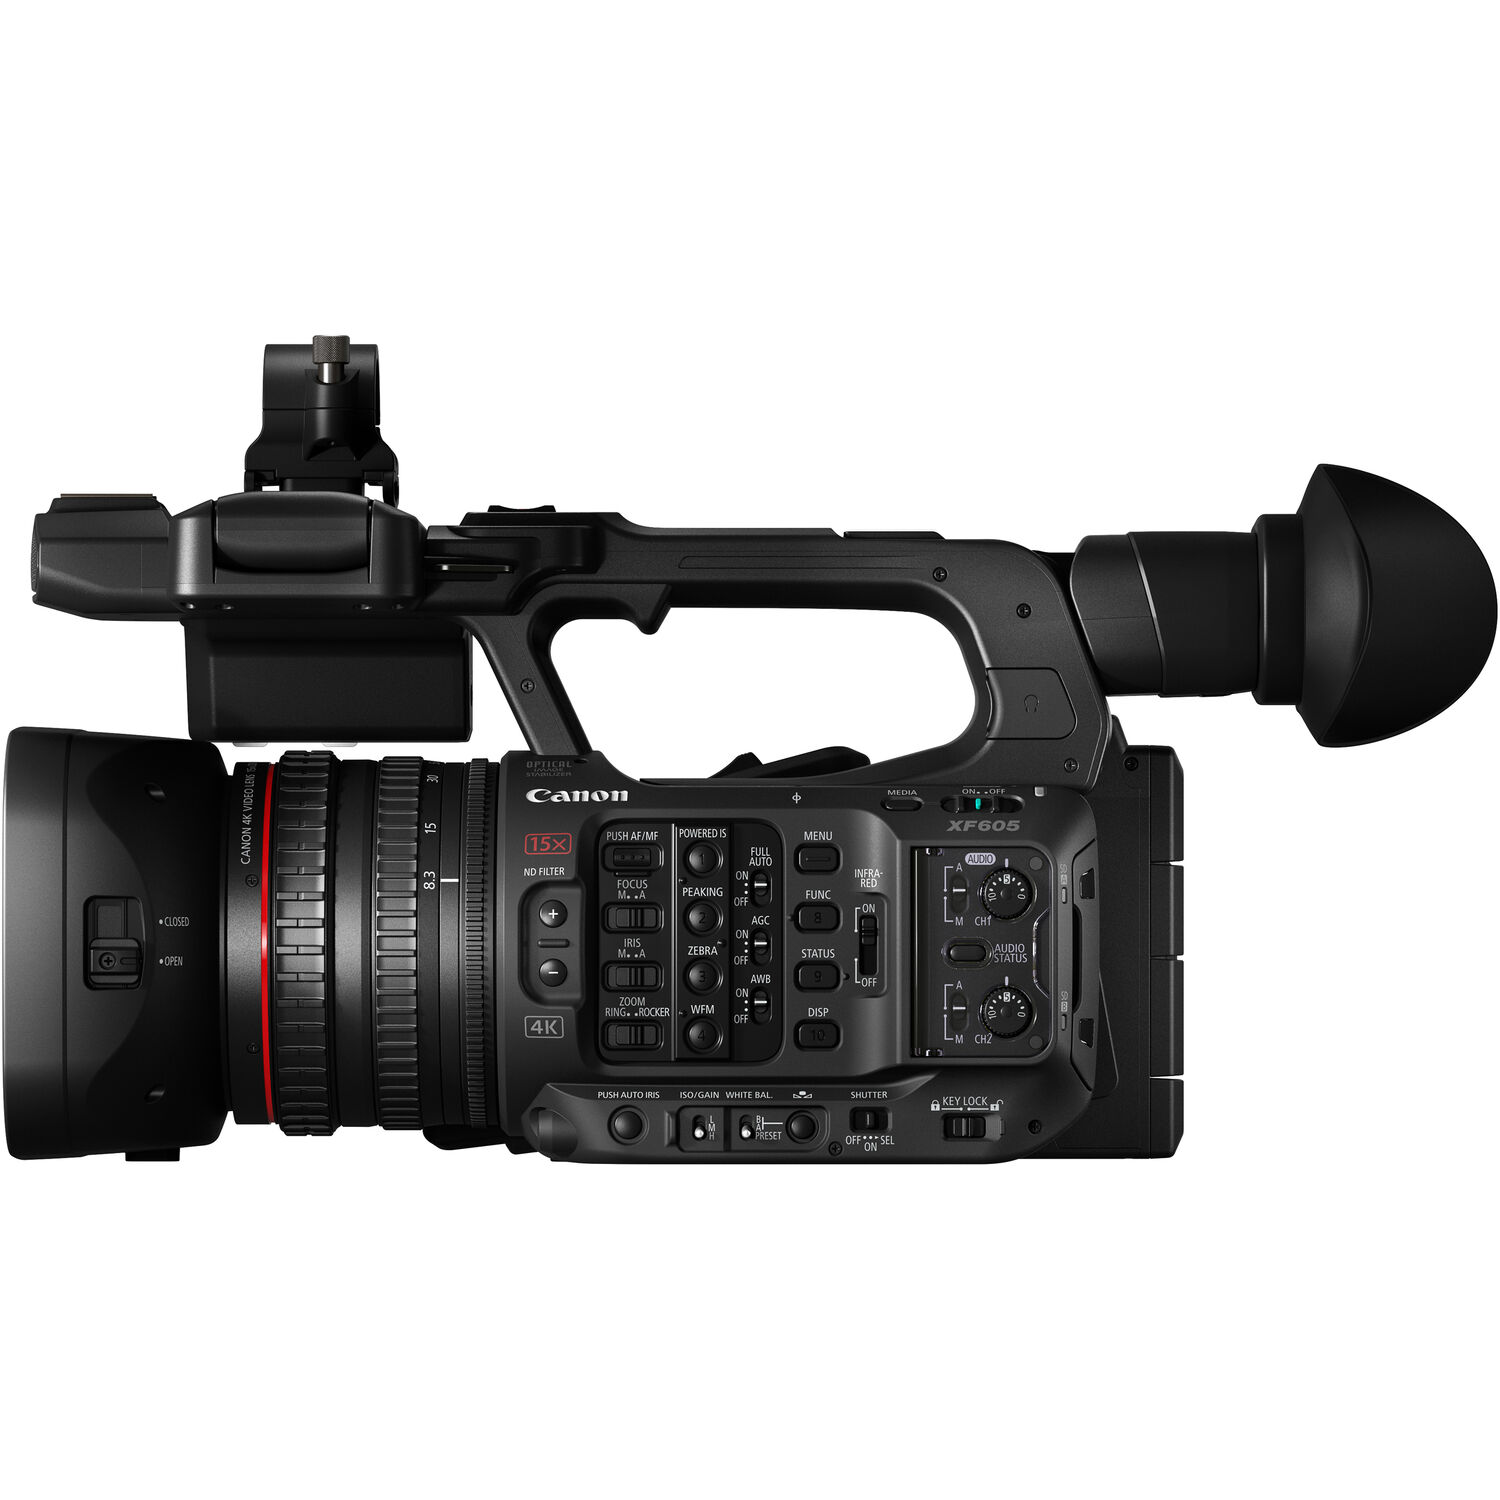
- Week 1: Class notes, Cybercollege units 10, 11, and 12 (cameras), VMI article: A Filmmaker’s Guide to Sensor Sizes and Lens Formats & Canon xf605 manual (PDF)- Side profile image (JPG)
- Week 2: Class notes and the B&H article: Cinema Cameras: What Filmmakers Need to Know (Read just the first part, up through “Frame Rates”.)
Shooting Checkilist - Before shooting always:
- Set the recording format, bitrate, pixel dimensions, and frame rate. (E.g. XF AVC recording format at 45 mbps, and 1080i.) Use 60i, 60p, or 30p for TV broadcast and 24 for film/cinema distribution.
- Make sure gain is turned off or set as low as possible. The gain value will be displayed in the viewfinder as "___dB".
- Check your shutter speed, which is typically 1/60 for 30fps TV and 1/48 for 24 fps film
- Check for proper white balance. Either use the proper preset (E.g. indoor or outdoor) or manually set the white balance.
- Check ND filters. When shooting inside or in darker environments, it's usually best to have them off. NDs are most useful in brighter environments as they reduce the amount of light entering the camera.
- Set timecode (optional). Standard practice is to use drop frame (DF) time code and to ask the producer if a certain preset is desired.
When shooting always:
- Record at least 3 seconds of pre-roll and post-roll. In other words, record for 3 seconds before cueing talent or starting camera moves. After the action or camera move is completed, keep recording for at least 3 seconds. Pre-roll and post-roll are extremely useful in editing.
- Use Zebra stripes to help determine proper exposure.
- Use the Peaking feature or Magnify button to set focus. The Magnify button enlarges a portion of the viewfinder to allow for sharp focus.
Workflow Review: After finishing a shoot:
- Copy enire contents of SD/CF card to an appropriately named folder on your media drive. (E.g." Lilly Library, October 12, 2018") I'd make sure it's backed up in other places as well.
- Eject the SD/CF card
- Launch edit software and save the project to a folder on your media drive (E.g. "Lilly Premiere Project")
- Set your scratch discs to be the same as your project
- Use the Media Browser to link to your footage
- Import and edit
Camera / lens review:
- Aperture - The opening that light passes through (E.g. iris). It can be described in f-stops.
- CCD - Charge Coupled Device (image sensor)
- CMOS - Complementary Metal-Oxide
Semiconductor (image sensor)
- CCD and CMOS sensors convert light to electrical energy. Lens diameters match CCDs, so a 2/3" lens would be mounted on a camera with 2/3" CCDs. The bigger the CCD, the more pixels you can fit on it. (The Sony Z1Us use three 1/3" CCDs, the Z7Us have 3 1/3" CMOS imagers, the Thompson cameras in Studio 5 use 2/3" CCDs)
- Resolution (Horizontal resolution is determined by the maximum number of vertical lines resolved. Requires a test chart.) The studio camera heads can resolve about 700 lines. VHS tape can only resolve about 230 lines.
- Gain (boosts signal and adds noise)
- Focal length - The distance from the optical center of the lens to the focal plane (image sensor) of the camera. When focused at infinity, a 100 mm lens will be 100 mm from the film plate or image sensor.
- Prime lens - A lens with a fixed focal length.
- Zoom lens - A lens that has a variable focal length
- Angle of view (Telephoto lenses have narrow angles of view, while wide angle lenses have wide, or large angles of view.
- Zoom ratio: Often (but not always) given in a ratio or two numbers (E.g. 17 x 10 or 100-300mm). When using a multiplier (x) the first number represents the minimum focal length in millimeters, and the second value is the multiplier. A 17 X 10 zoom lens would have a minimum focal length of 17mm and a maximum focal length of 170mm. Two numbers can also be used to describe the shortest and longest focal lengths (E.g. 28-105mm).
- Compressing distance: telephoto lenses provide the effect of compressing distance along the Z-axis (towards and away from the camera).
- Changes in apparent speed: Telephoto lenses also have the effect of slowing down Z motion. (The Z vector is directly in-line with the lens- as opposed to up and down or left to right.)
- Perspective changes - Wide angle lenses can cause distortion
- What is "normal”? A normal lens captures a field of view without visible distortion and that looks natural. To calculate the normal lens, measure diagonally from corner to corner. (e.g. a 50 mm lens would be "normal" for a 35 mm camera.
- Lens speed - Lenses which let lots of light in (have large apertures or are capable of small f-stops) can be labeled as "fast". These usually cost quite a bit more than their "slower" counterparts.
- F-stop - These numbers are inversely related to size of the aperture or iris opening.
- Depth of field - the range of distance that objects will be in focus
- Relationship between depth of field and f-stop - the higher the f-stop (smaller aperture) the greater the depth of field you will have.
- ND filters - Neutral density filters don't influence the color temperature. They are gray and translucent. Their purpose is to reduce the amount of light coming into the camera.
Image Sensors - The lens focuses the light onto an imaging sensor. In the old days cameras used tubes, then came CCD (Charge Coupled Device) sensors, and now we have CMOS (Complementary Metal-Oxide Semiconductor) imaging devices. CMOS sensors are beginning to become more widely used as they are a bit easier to manufacture and use less power than CCDs. The tiny camera in your laptop or cell phone most likely uses a CMOS imaging device.
3-chip video cameras use beam splitters, which consists of prisms. Some refer to this as the prism block. The incoming light is split into its primary components, RED, GREEN & BLUE and recorded onto three separate CCD or CMOS imaging elements. These elements are about the size of a postage stamp and convert the light energy into an electric charge. While the industry norm has been to use three imaging elements, a growing number, such as the Red One, are using a large, single CMOS sensors.
Here's a nice picture of a prism block from Adam Wilt's amazing and informative website:
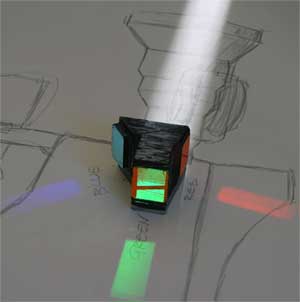
Image Sensor Size - Image sensors come in many different sizes. The smallest, often found in inexpensive camcorders might have 1/4" sensors (measured diagonally). Many GoPros have sensor sizes of 1/2.5". The Sony NX5Us have 3 1/3" CMOS sensors and the Canon XF405 use a single 1" sensor. Our LDK4000 studio cameras in Studio 5 use 3 2/3" CMOS sensors. Canon 60D and 7D DSLRs have APS-C sensor sizes, also known as cropped-frame. These are 22.3 x 14.9 mm, which is a little smaller than 35mm. Canon 5D, RED, Black Magic Cinema Cameras use full frame 35mm image sensors.
Here's an illustration showing many common sensor sizes.
The relationship between imager size and depth of field: The smaller the image sensor, the greater/wider the apparent depth of field. (Due to the physics of optics.) Camcorders with small sensors (E.g. 1/4") will have a greater depth of field than cameras with large sensors, like a 35mm DSLR, which would have a shallower/narrower depth of field.
F-stop - An f-stop represents the size of the aperture in an inverse manner. A large f-stop corresponds to a small aperture, or opening in the iris. A small f-stop represents a large opening. You should know your standard f-stops: 1, 1.4, 2.0, 2.8, 4, 5.6, 8, 11, 16, 22, 32. Increasing one f-stop will cut the light in half. Decreasing the f-stop by one will double the light.

The relationship between F-stop and depth of field: The larger the f-stop (or smaller the opening) the greater your depth of field will be. The smaller the f-stop, the smaller/shallower the depth of field will be.
Think about this. You'd like to capture a cinematic MCU of a subject (with the background out of focus). Out of the f-stops above, which is best for your purposes?
or
You are on the south rim of the Grand Canyon and want to take a sweeping picture with everything from near to far in focus. What's the best f-stop to use?
How to get video to look more like film - There are several reasons why films and TV shows have different "looks". The primary reasons are related to the depth of field and how the camera and lenses are moved. Because video is captured on smaller sensors, it inherently has a wider depth of field. Video cameras also have servo zoom switches, which are absent on most film or digital cinema cameras. In a film, the camera might be moved closer to the subject with a dolly, but in TV, the camera operator would likely zoom into the subject while the camera remains on a tripod. Another reason is using 24 frames per second shot in progressive mode rather than shooting 60 interlaced fields.
In order to get the most cinematic look out of your video camera try the following:
- Shoot with the largest aperture possible (smallest f-stop). The will give you the shallowest depth of field.
- Exagerate the shallower depth of field with a telephoto lens
- Don't use the servo zoom lever
- Shoot in 24p
Sensitivity - How much light does the camera need to operate? This is called minimum illumination or sensitivity. It’s measured in foot-candles (American) or lux (European) in relation to a given shutter speed. For example the Canon xf405 camcorder with its 1" sensor has a reported minimum illumination iof 1.7 lux at 1/30th of a second. The Canon C300 and its cropped Super 35 sensor has a reported minimum illumination of .3 lux at 1/60 of a second.
Aspect Ratio - Aspect ratios are the ratio of width to height of the screen. Most early television shows (E.g. The Brady Bunch) were produced in 4x3. Current HD broadcast uses 16:9.
- 4 x 3 (or 1.33:1)
- 16 x 9 (or 1.78:1) This is closer to 35 mm movies.
DTV (Digital TV) - The broadcast of NTSC (analog video) ended in Feb 2009. Broadcasters now transmit digital video using ATSC standards (Advanced Television Systems Committee). Digital TV supports older 4:3 content and new, HDTV programs recorded in 16 x 9. The new ATSC standards also support a number of new frame rates. In addition to 60i we have 24p (actually 23.98), 30p (29.97) and 60p (59.94).
Frame Rates - So many frame rates, so little time.... What's up with 30 vs 29.97 for broadcast TV and 24 vs 23.98 for theatrical content?
Video runs at about 30 frames per second, but in actuality it runs at 29.97 fps (or 59.94). This is the frame rate to use for broadcast TV.
When we shoot video 24p, we're actually using 23.98. This is the frame rate to use for theatrical purspoes (E.g. movies).
Interlace Scanning vs Progressive - Most TV is broadcast using interlaced video. In interlaced video, we scan first the odd frames for the first field and then the even lines approximately a 60th of a second later. You get (roughly) 30 frames each second or 60 fields per second. Interlaced scanning was developed for broadcast TV and is not the ideal manner to deliver videos via the web.
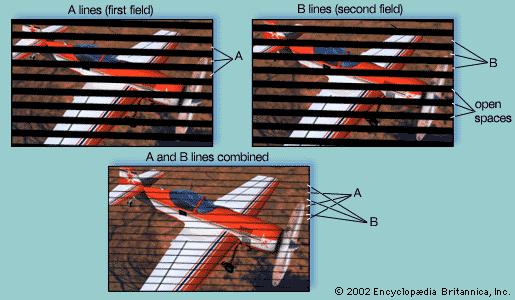
(Image courtesy Britannica.com)
Progressive Scanning: The electron beam scans each line sequentially. It does not use two interlaced fields.
ATSC HDTV delivery formats:
Horizontal lines |
Vertical lines |
Frame Rate |
1280 |
720 |
60p, 30p (29.97), 24p (23.98) |
1920 |
1080 |
60i, 30p (29.97), 24p (23.98) |
Note that many HD production formats do not record the full pixel dimensions listed above. Some use few pixels horizontally, and then stretch the image upon output to the full pixel dimensions.
For instance 1080 HDV actually records at 1440 x 1080. Panasonic's DVCProHD 1080i uses 1280 x 1080.
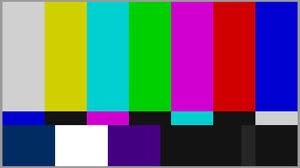
Setting Proper Exposure (aperture control) - Monitors are good to have but don't trust them until they've been calibrated. The same applies for viewfinders. It's a good idea to run color bars through your monitor or viewfinder before using it to adjust the iris.
Waveform monitors display luminance (Commonly referred to as brightness) and can be built into camcorders and incorporated into field monitors. The major levels to be aware of are:
- 0 IRE - For the darkest (blackest black) portions of your video
- 100 IRE - For the brightest portion of the screen (E.g. white, fluffy clouds on a sunny day)
SMPTE color bars generated from your camera should look something like this:
On a waveform monitor this is how they'd appear:
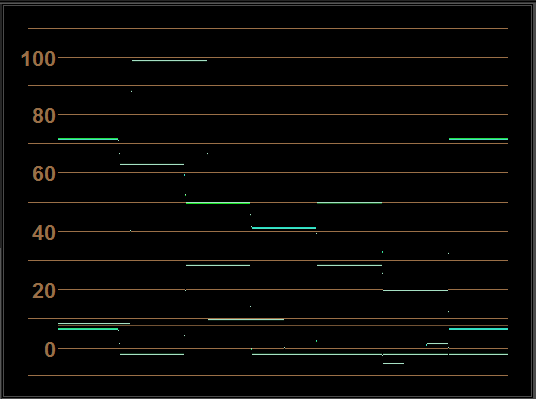
Note the IRE values of the various colors. Remember that the maximum legal, allowable value for broadcast video is 100 IRE. The blackest black for digital video is 0 IRE.
While waveform monitors are helpful, they aren't always available in the field. This is one reason it's good to learn how to use the zebra stripe function on a camera.
Zebra Stripes - Zebra stripes are a visual aid that helps the camera operator set the proper exposure. Zebra stripes become visible in the viewfinder when a certain IRE luminance (aka Brightness) level is reached. You can adjust the threshold level through the camera's menu. Don't use zebra stripes unless you know what they are set for.
Lab next week:
- Cameras (Cont.)
- Continuity techniques (Film style continuity vs. technical continuity)
- Avid Media Composer or Motion Graphic lesson
Vocabulary words:
- 180° line
- Angle of view
- ATSC (Advanced Television Systems Committee)
- B-roll (alternative footage edited into the main storyline) "We've got that B-roll!"
- CCD (imaging element)
- CMOS (imaging element)
- Depth of field
- F-stop
- Focal length
- Frame rate
- Interlaced scanning
- Macro lens
- ND (neutral density)
- NTSC (National Television Systems Committee)
- Prime lens
- Progressive scanning
- Rack focus
- Waveform monitor
- Zebra stripes
- Zoom lens (has a variable focal length)
- Zoom ratio
Back to Jim Krause's P351 Home Page
