

Jim Krause | Classes | C228 Multi-Cam TV Studio Production 1
Week 2
Announcements/Reality Check
- Critical Viewing Exercise due this week.
- Virtual (at home) 3 Camera Blocking Exercise this week
- Readings:
- Cybercollege:
- Last week: 10, 12, 13
- This week: 15, 16, 17, & 18
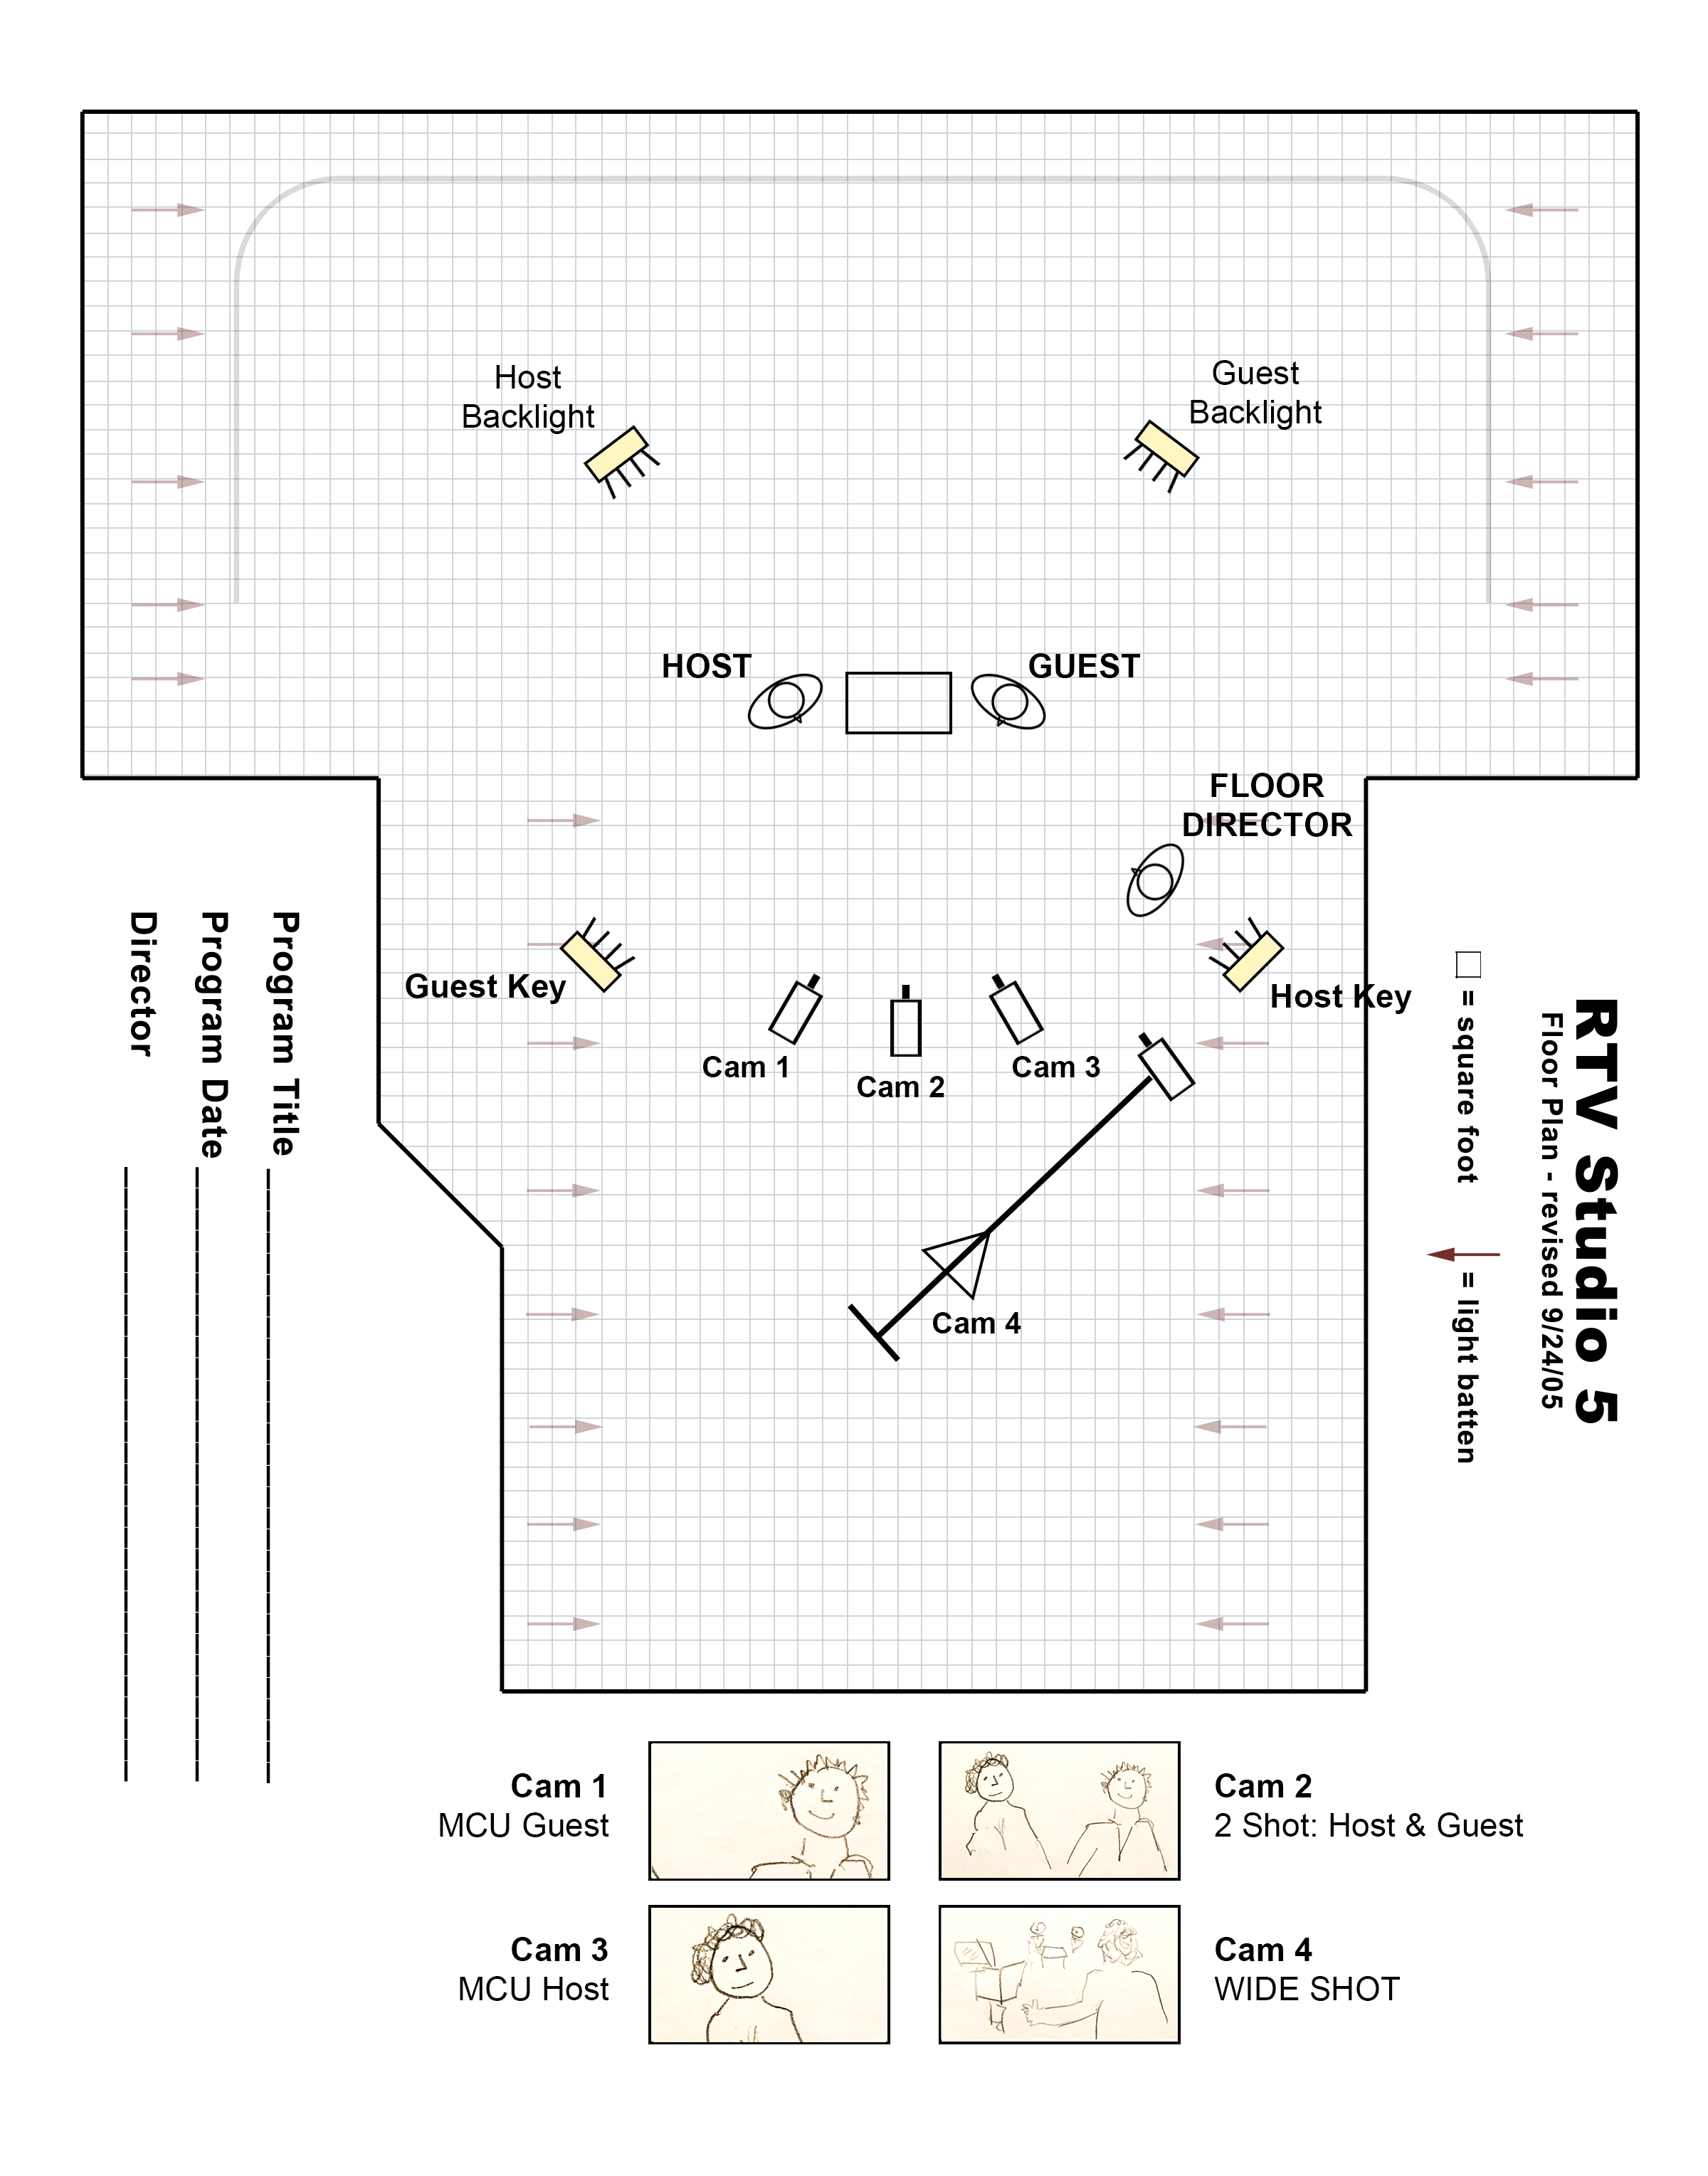
- Take a look at some sample floor plans:
- Cybercollege:
Agenda:
- Wrap up Critical Viewing Exercise
- Cameras & lenses
- F-stops and Depth of Field
- Framing
- Discuss this week's lab exercise
Critical Viewing Wrap Up
Openings:
- Tonight Show: Jimmy Fallon
- Late Show with Stephen Colbert
- NBC Nightly News (News teaser)
- Seinfeld (credits over opening monologue)
- The Ellen Degeneres Show (starts right into opening sequence)
- Rosie O' Donnell show
Common techniques:
- Often a pre-produced piece or teaser is used before the title/opening credits
- Music starts full or at bed level under dialog (doesn't fade up)
- Audio and video start together
- Songs with lyrics are rarely used underneath someone talking
- Dynamic lighting, graphics, and camera moves
Blocking & Continuity
Blocking in film & TV is working out the movement and framing of the subjects in relation to the camera.
Always keep continuity in mind and the location of the primary line of action (the 180° line).
- For talk/variety shows, it's usually the front of the stage area. Cameras and the audience are positioned on one side of the line.
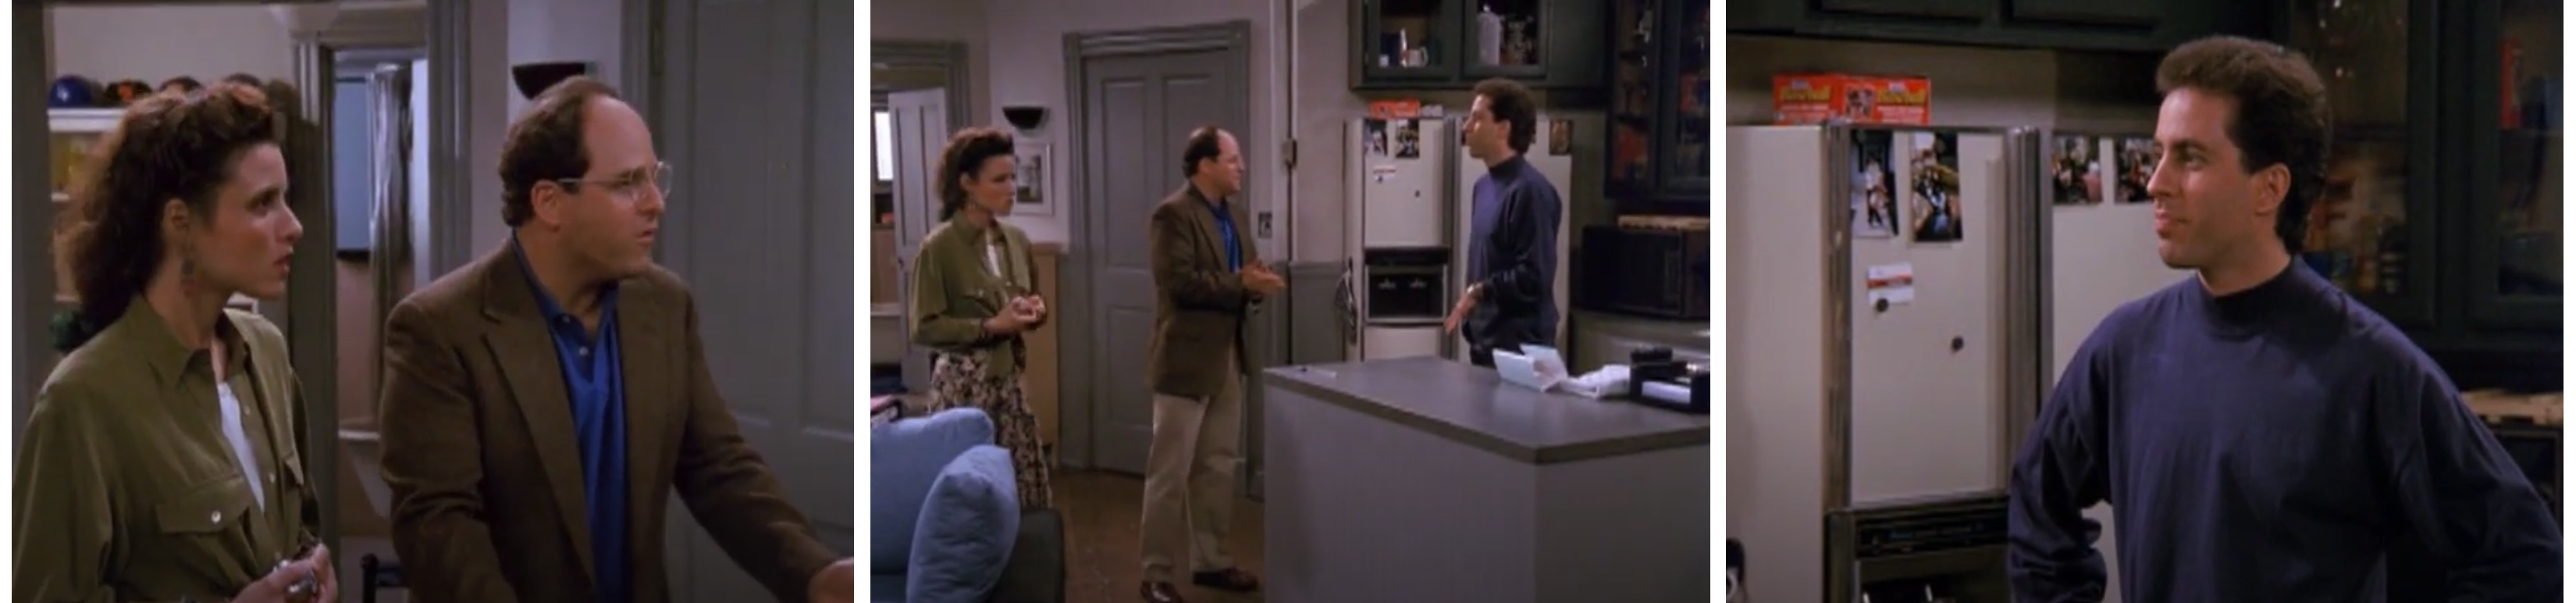
- Soap operas and sit-coms like Seinfeld also have a primary 180° line. Keeping cameras on one side of the line will ensure that actors don't suddenly reverse their orientations.
Review this week's (at home) Virtual 3-Camera Blocking Exercise
TV Studio Cameras:
Major parts:
- Zoom Lens
- Viewfinder with tally light
- Camera body (contains a beam splitter and image sensors)
- Teleprompter
- Intercom/headphones
- Pedestal
- Zoom and focus control
- Camera cable (Triax)
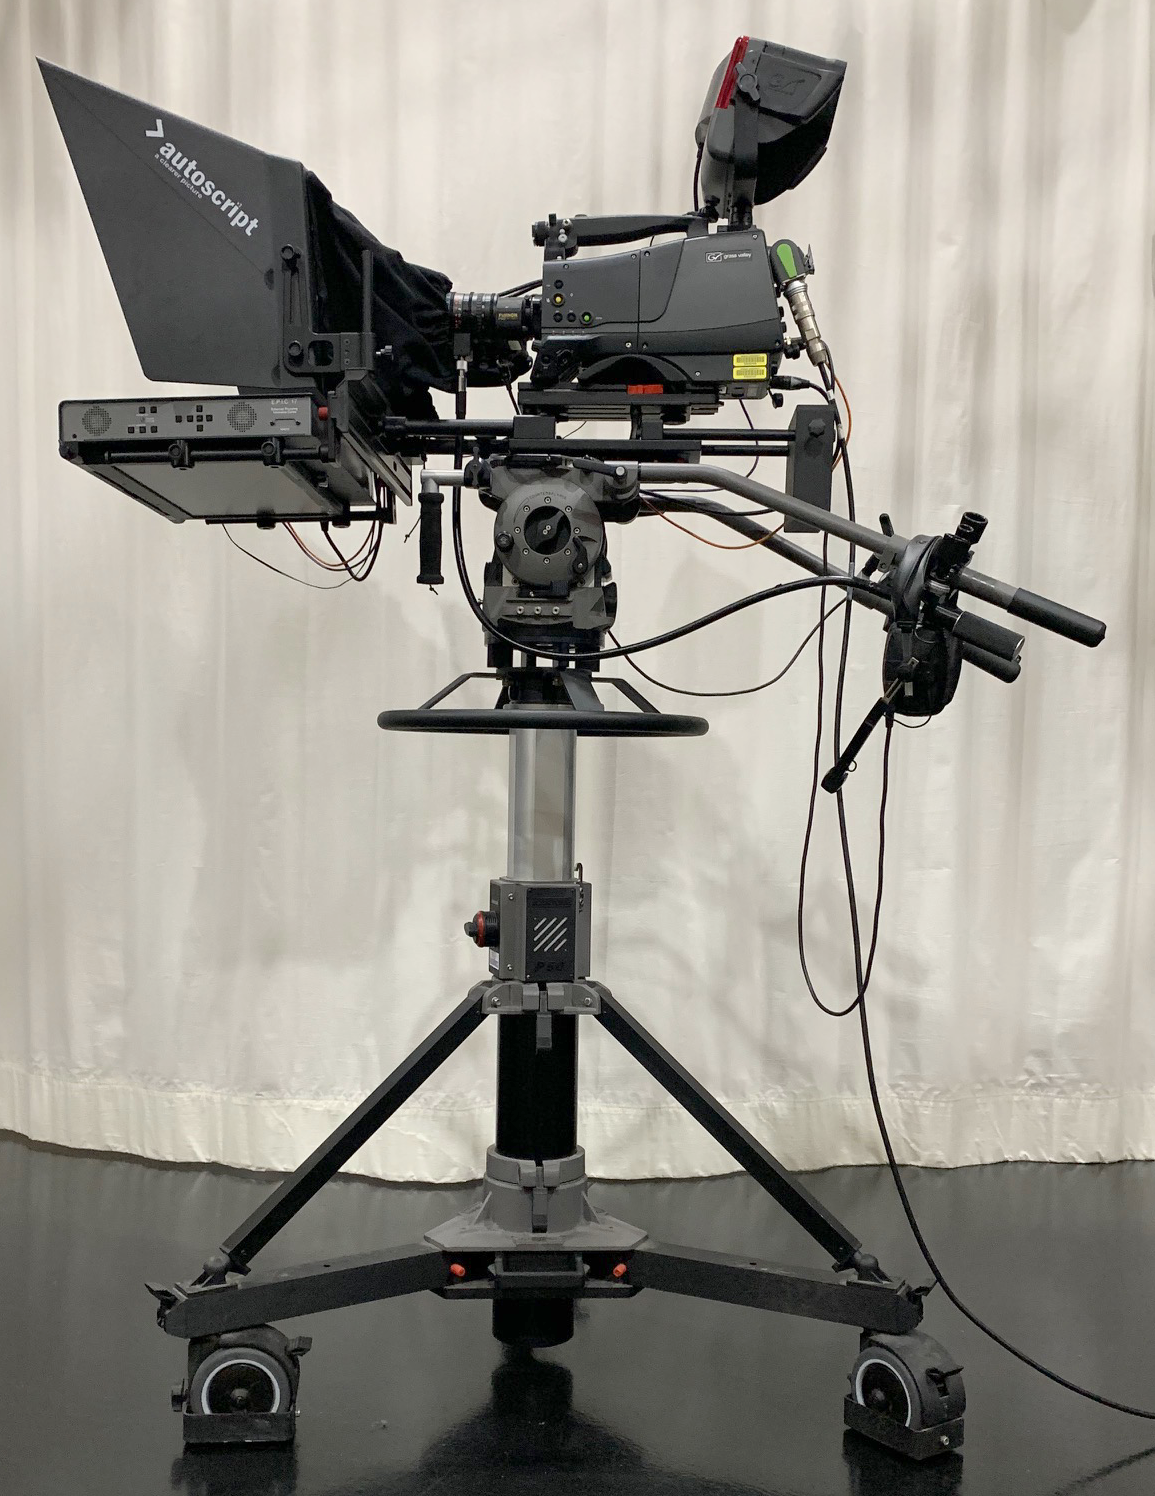
Image Sensors - The lens focuses the light onto an imaging or pickup device. In the early years, cameras used tubes, followed by CCDs (Charge Coupled Device). Most camcorders, laptops, and phones now use CMOS (Complementary Metal-Oxide Semiconductor) sensors. CMOS sensors have become more widely used as they are a bit easier to manufacture and use less power than CCDs.
Most professional studio cameras use three image sensors and a beam splitter, which consists of prisms. The incoming light is split into its primary components, Red Green & Blue and recorded via three separate CCD or CMOS imaging elements. These elements are about the size of a postage stamp and convert the light energy into an electric charge. While the industry norm has been to use three imaging elements, a growing number, such as the Blackmagic Studio Camera, are using one large, single CMOS sensor.
Here's a nice picture of a prism block from Adam Wilt's amazing and informative website:
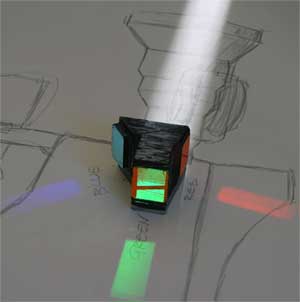
Image Sensor Sizes - Image sensors are made in different sizes such as 1/4", 1/3", 1/2", 2/3", 1", 4/3" APS-C, and 35mm (full frame).
Due to the physics of optics, smaller sensors (E.g. 1/4") inherently have a larger or greater depth of field compared with larger sensors (E.g. 35mm), which have a shallower or smaller depth of field.
Cameras with small sensors (ike a phone or a GoPro) can easily capture subjects spanning large distances. Cameras with large sensors (like a 35mm DSLR) can capture images with a shallower depth of field.
Most professional multi-camera TV studio cameras (like the Grass Valley LDX cameras in Studio 5) have a prism block and three 2/3" CMOS sensors, one for each primary color of the RGB
Sensitivity - How much light does the camera need to operate? This is called minimum illumination or sensitivity.
Aspect Ratio - The aspect ratio should always be provided in width to height. Before the advent of HD, TV was broadcast in 4:3. HD is broadcast in 16:9.
- 4 x 3 (or 1.33:1)
- 16 x 9 (or 1.78:1) This is closer to standard widescreen movies.
Other parts of a studio camera include:
Camera cable - A single Triax cable connects the camera to the camera control unit (CCU) in the studio, passing power, intercom signals, video, and the teleprompter feed.
Camera control unit (CCU) - Each camera is connected to its own CCU located in the control room. The CCU allows an engineer to control almost all functions of the camera (turn off/on, change filters, set white balance, adjust iris, etc.).
Filter wheel. It usually holds a couple of neutral density (ND) filters and a color correction filter (3200 degrees Kelvin for indoor, 5600, 5600 + 1/4 ND, etc). Our Grass Valley LDK studio cameras have two filter wheels. One holds ND and color temperature filters. The other holds star filters and a soft effects filter.
Neutral Density (ND) Filters - These filters found on professional cameras reduce the amount of light entering the camera without affecting the color. ND filters are useful if a larger aperture (smaller depth of field) is desired.
Viewfinders: small video monitor mounted on top of the camera. Typically will be LCD (Liquid Crystal Display) or OLED (Organic Light emitting Diode).
Power supply: 12 volts- conveniently the same voltage a car runs on.
Gain Switch - The gain feature boosts the level of the video signal electronically. Since the video is "amplified", it's done so in dBs. (+3 db, +6 db, + 9 db, etc.) Turning on the gain adds noise and excessive amounts will produce noticeable graininess.
Shutter Speed - In the US (NTSC) the default shutter speed for 1080i video is 1/60 of a second. (This is the interval of a field of video.)
Tally Lights - Small lights (usually red) which indicate which camera is "live"
White Balance - When the engineer presses the WB button the camera adjusts the Red Green & Blue signals to be of equal intensity. (In the RGB color system, white is made up of equal components of red, green and blue.)
Black balance - irises the lens down all the way to black and sets the pedestal/black level at 0 IRE.
Lens Terminology:
Focal length: the distance from the optical center of the lens to the target (image sensor). Measured in millimeters. An 18mm lens would generally be considered a wide angle lens. A 200mm lens could be considered a telephoto lens.
- Prime lens - Has a fixed focal length
- Zoom lens - Has a variable focal length. Zoom ratio - The ratio of the shortest to longest focal lengths.
Angle of view: Wide angle lenses have a wide angle of view. When you zoom in all the way to a CU you have a very small angle of view.
Aperture - An opening that light passes through. In a lens, this is the iris and is measured in f-stops.
F-stop - A number that represents the size of the aperture in an inverse manner. A large f-stop corresponds to a small aperture, or opening in the iris. A small f-stop (E.g. 1.4) represents a larger opening in the iris.

Depth of Field (DOF)
Capable camera operators can control the depth of field (DOF), which is the distance between the nearest and farthest objects that are in focus. Depth of field is affected primarily by aperture and image sensor size. It can also be made more or less apparent by the focal length.
The relationship between f-stop and depth of field: The larger the f-stop (smaller the opening or aperture) the greater your depth of field will be.
Selective focus - the process of using limited depth of field to throw areas of the image out of focus
Rack focus - varying the focus from one object to another
Follow focus - Keep focus on an object moving towards or away from the camera. (Separates the amateurs from the pros.)
Macro focus - Macro lenses are capable of capturing objects very close to the camera lens. (E.g. capturing an extreme close-up of a flower.)
Auto focus - Typically not found or used on professional studio cameras. While it is found on field cameras, a major problem is that in complex compositions, the camera doesn't know what to focus on.
Auto iris - automatically controls the iris to maintain the proper exposure. This can often lead to problems. If something bright enters the frame- the camera will iris down causing a noticeable darkening of the image.
Framing
It's important to know and be able to frame basic shot types.
- Wide Shot (WS- Often used to establish locations)
- Full Shot (FS)
- Medium Full Shot (MFS)
- Medium Shot (MS)
- Medium Close-Up (MC)
- Close-Up (CU)
- Extreme Close-Up (ECU)
- Over the Shoulder (OTS)
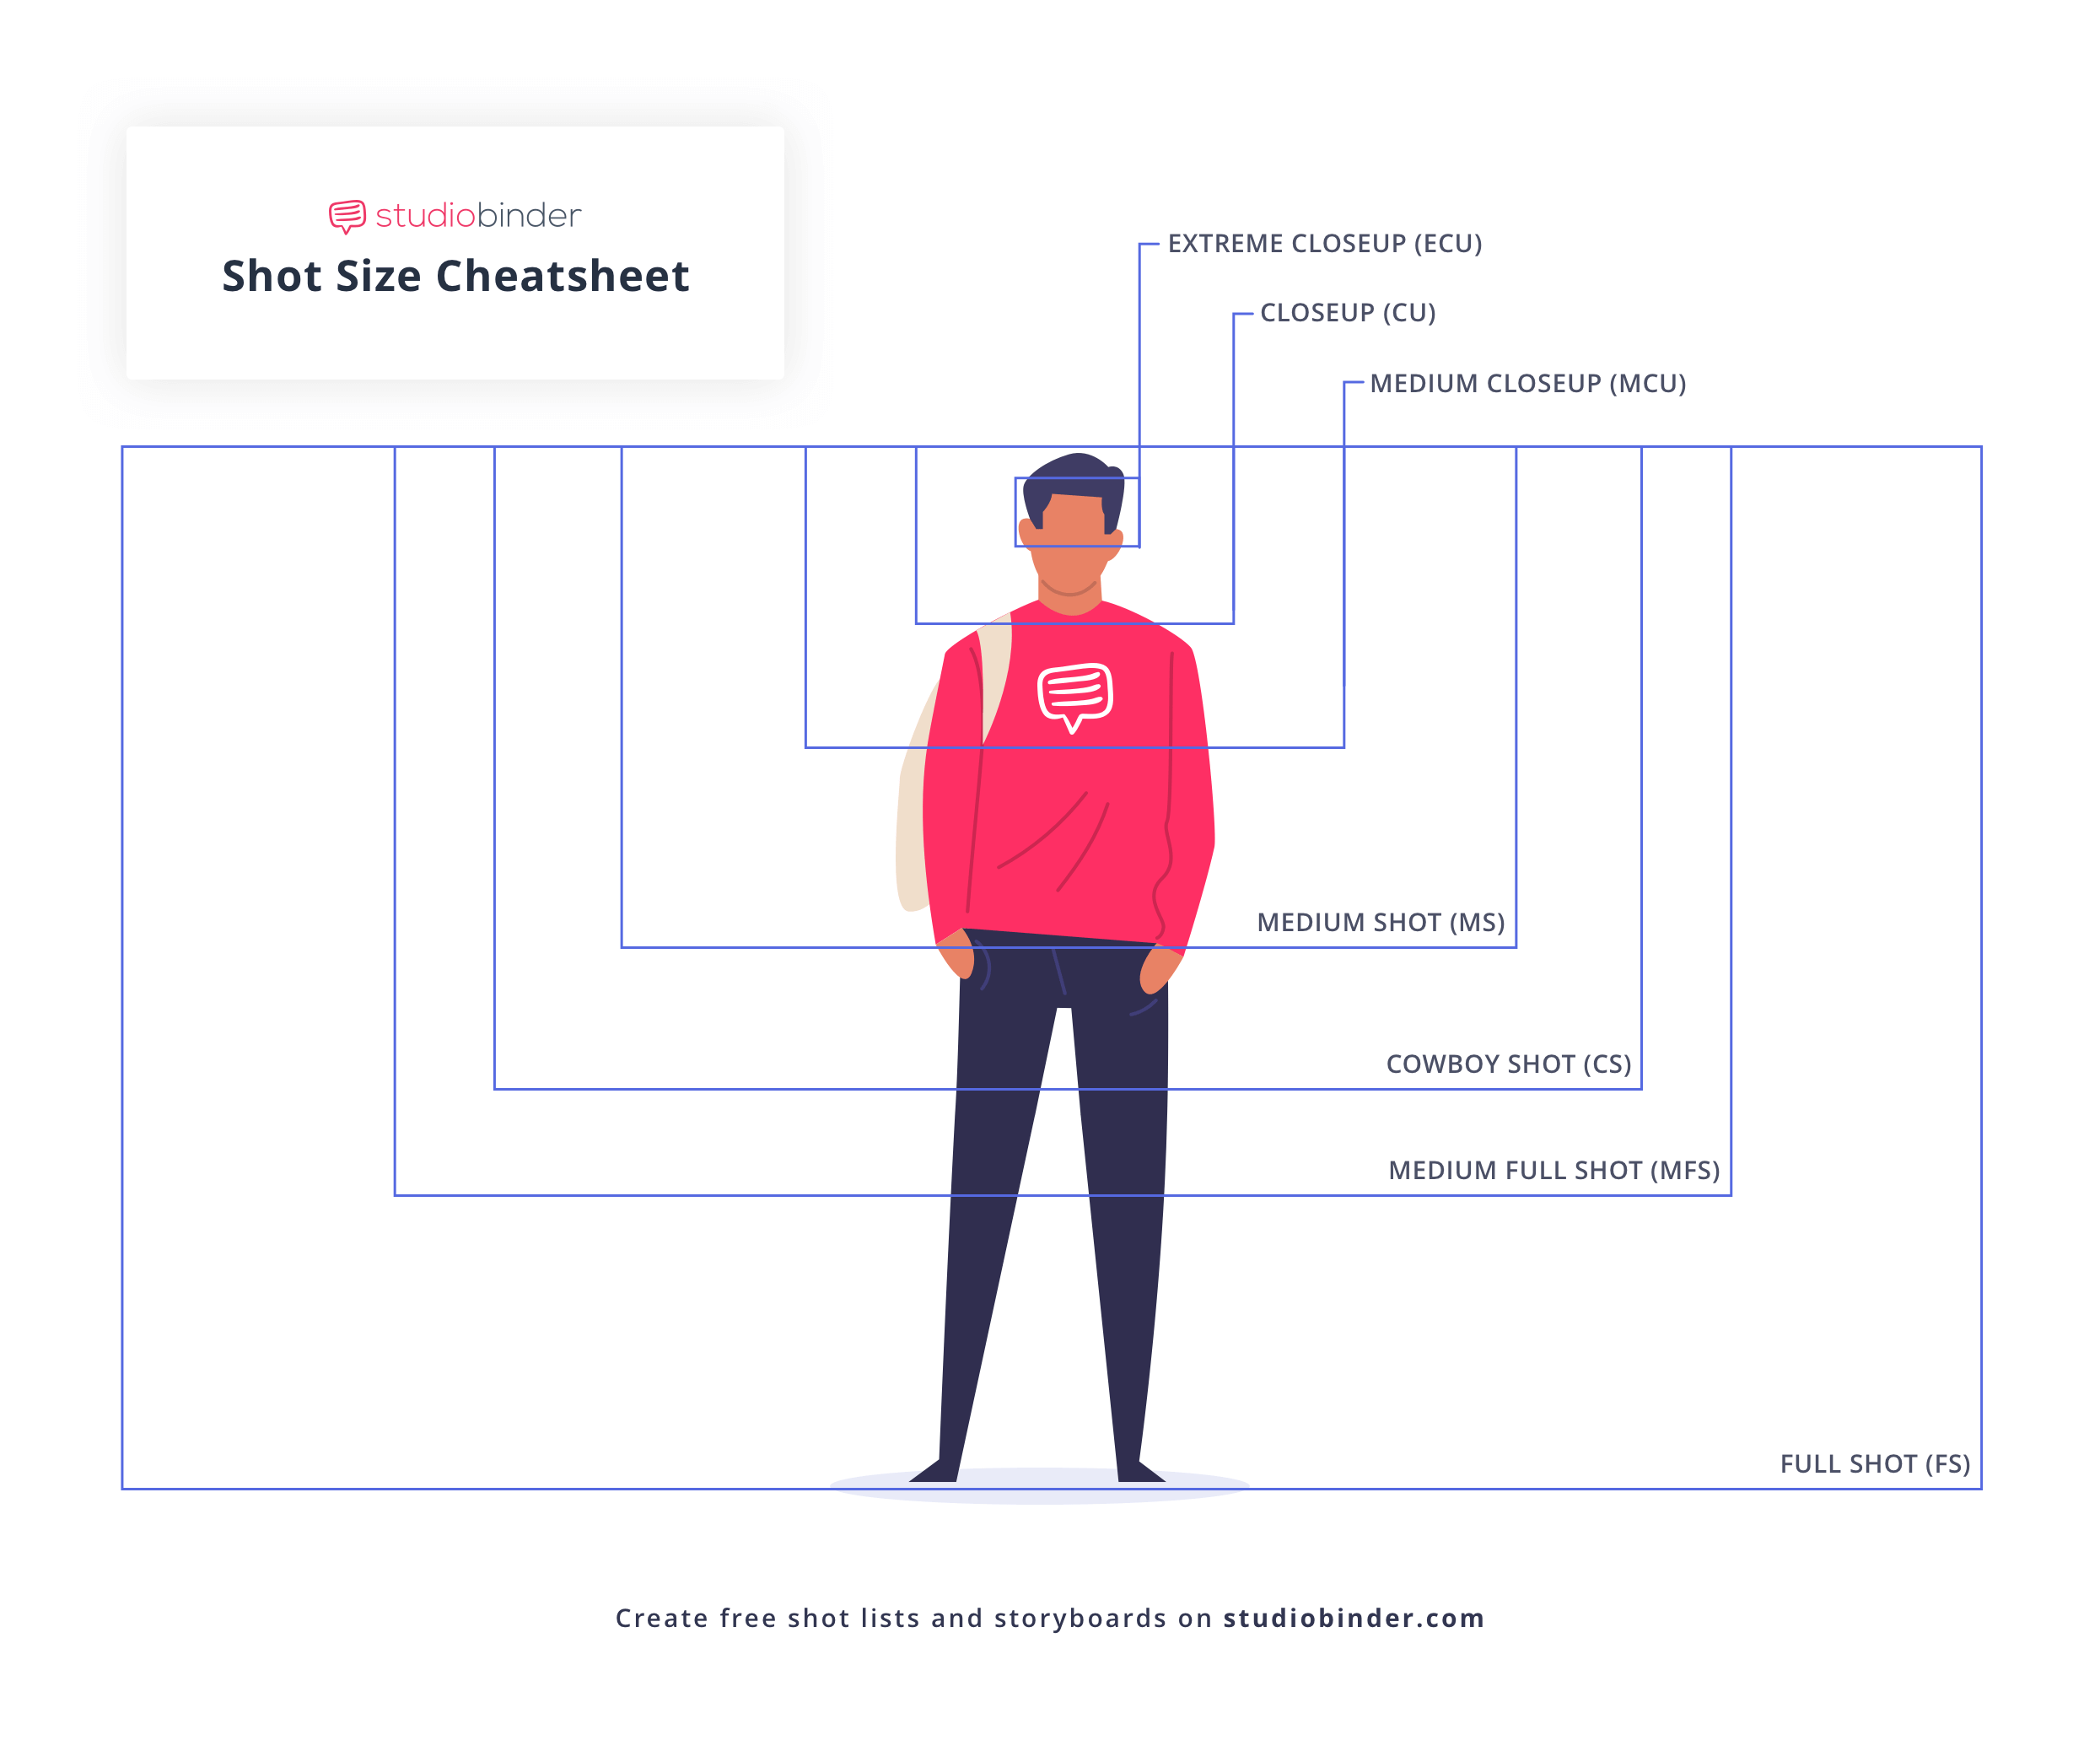
There are many other variants some with interesting names. Here's a good article from B&H and another from WIX.
A few rules: Don't cut feet off at the ankles or hands off at the wrist. Either pull out to a wider full shot to include the feet, or tighten up to a Medium Full Shot or Cowboy Shot. For Close-Ups: Don't cut off people right at the neck. Either pull out to show a little shoulder or tighten up to an Extreme Close-Up.
This week's (at home) lab:
We'll check in and see how last week's exercise went. Then you'll have the lab time to carry out the Week 2 (at home) Virtual 3-Camera Blocking Exercise
Next week in lab:
(at home) Graphics Exercise
Lab 2 ----------------------------------------------------------------------------------------------
Objectives:
- Give students practice planning blocking and camera positions
Agenda:
- Welcome, attendance, and review last week's exercise
- Note any problems
- Talk about this week's lab exercise (At home Virtual 3-Camera Blocking Exercise).
