

Jim Krause | Classes | T584 Documentary Production
Week 7
Agenda:
- Review Interview/Lighting from last week
- Review quiz
- Projects update - check in
- Audio Overview
- Audio Exercise
Audio 101
Introduction - Most film and documentary soundtracks have multiple layers of sound: dialog, environmental ambience, sound effects, and music. Audio cues tell us where we are- maybe even what the weather is like.
Elements of a soundtrack:
- Natural (diagetic) audio
- Dialog
- Environmental sounds
- Sound effects
- Music
When done right the audience doesn't notice the soundtrack - but it's adding important information and meaning to the scene.
Audio Monitoring - The audio playback most consumers experience at home is likely far better than what you have access to in the Production Lab. Don't trust computer speakers or an inexpensive pair of headphones. If you want to create good soundtracks invest in good speakers and headphones.
Audio perspective -Viewers expect sounds from far away to sound distant and sounds nearby to sound close. Consider these two shots:
1 - Wide shot inside a busy diner full of people. Our two lead characters enter and move towards a booth.
2- 2-shot of them in the booth They start to talk.
In the wide shot we'd expect to hear diner noise and ambient sounds. In the 2-shot we'd expect to hear their conversation and less ambient diner sounds.
This is why in dramatic film & TV production, the shotgun/hyper-cardioid microphone is usually favored over lavalieres. We can vary the distance (matching the camera) so the audio perspective matches what we are seeing through the lens.
Loudness & Frequency
Loudness can be measured in decibels (dBs) and can be represented visually with VU or digital meters.
Broadcast Safe/Legal Levels - Broadcast stations (including WTIU) must make sure the audio levels in their programming are consistent and adhere to technical standards set by the FCC. Many stations aim for an average dialog level of -20.
AGC - The automatic gain/volume control feature on camcorder tries to get a consistent level. If it’s soft, it’ll boost the signal. If it’s loud it’ll turn it down. Don’t use it! It’ll bring the noise floor up and reduce your dynamic range.
Frequency is measured in Hertz or cycles per second
- Hertz = CPS cycles per second
- Kilohertz (kHz) = 1000 Hertz
- Human hearing generally ranges from 20 Hz to 20 kHz
- Concert A = 440 Hz
- Middle C is 261.63 Hz
- The human voice ranges from about 100 – 9,000 Hz
Microphones - Microphones convert one form of energy to another: acoustic sound waves to electricity. Microphones can be classified by their electrical characteristics and pickup patterns.
Electrical Characteristics:
Dynamic - Works opposite of a speaker. A wire coil attached to a diaphragm is suspended inside a magnetic field. Sound waves hit the diaphragm making the coil move. This creates a flow of electricity in the coil windings.
Dynamic microphones are typically durable and a good choice for hand held vocals or percussion instruments.
Condenser - (a.k.a. electret or capacitor)- Need batteries or phantom power to operate. A plate or diaphragm moves adjacent to a stationary, charged backplate. The capacitance between the two plates changes as the diaphragm moves modulating an electric current. This current must be boosted by a preamplifier to create a usable signal.
Condenser microphones are often more sensitive than dynamic microphones but output a larger signal. They are a better choice for distant recording and lower level sound sources. Most full range, high-quality studio microphones are condensers.
Phantom power is DC voltage sent up the microphone cable to power a condenser microphone. (48, 24 or 12 volts) It originates from a camera, audio mixer or other audio device.
Ribbon - A small (extremely delicate) metal ribbon is suspended inside a magnetic field. Sound waves move the ribbon, creating an electrical flow.
Because of their delicate construction, ribbon microphones aren't suitable for windy conditions or extremely loud sound sources. They are often used for vocal recording.
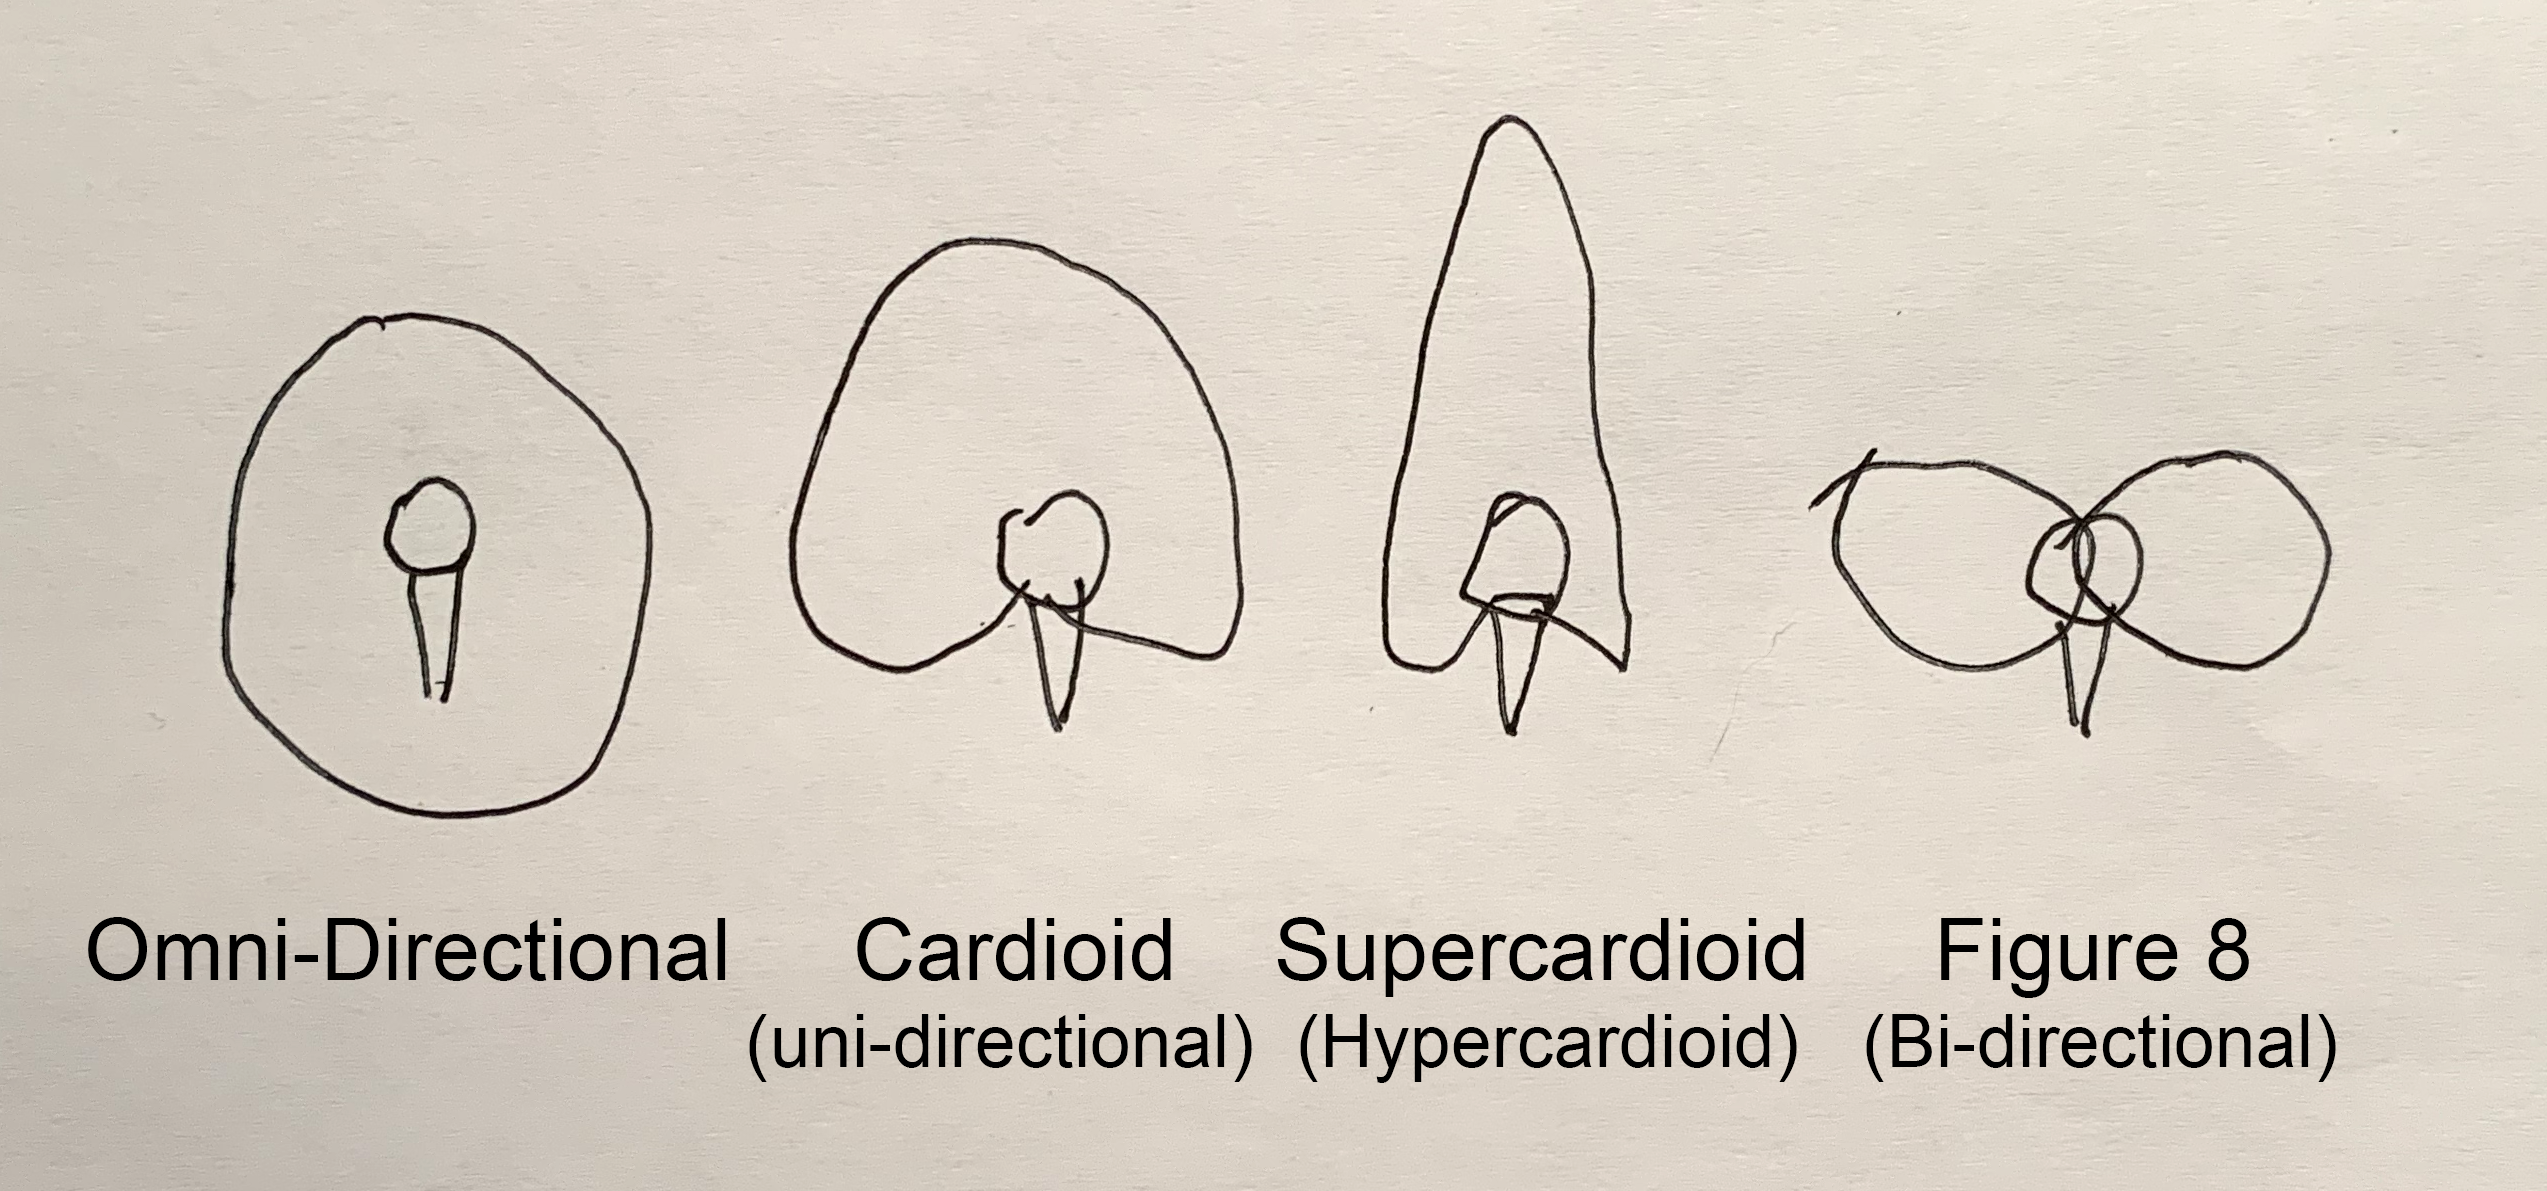
Polar Pickup patterns:
- Omni- pickup sounds well from all directions.
- Cardioid (a.k.a. unidirectional) They have a directional (heart-shaped) pickup pattern
- Super or Hyper-cardioid - very directional (E.g. shotgun microphones)
- Figure eight a.k.a. bi-directional
Applications:
- Lavaliere - Widely used in film & video production. Lavaliere microphones provide a consistent sound close to the source and are inconspicuous. Wireless versions of these are a must have for professional videographers.
- Hand held – Can be hand held or mounted on a stand (preferred). Hand held microphones are useful for "man on the street" interviews.
- Stands (floor & desk) Desktop stands are obtrusive but provide good sound quality and can be positioned close to the source. Mic stands are the most useful for music productions as they can be positioned in a variety of ways.
- Boom Stand / Fishpole– Floor stands and hand held boom poles (known also as fishpoles) are typically used with a shotgun microphones but are also useful for securing other microphones (E.g. stereo pair).
- Headset – Provide audio monitoring for performers and a consistent sound source. (Used frequently for sporting events and by performers.)
- Parabolic mount. A large bowl with handles on the outside and a microphone mount on the inside. These are extremely directional and sensitive. Commonly used for sporting events, capturing press conferences, and for spying,
Signals, cables and connectors
Mic / Line Level - The XLR audio inputs on camcorders and mixers can usually be switched from line level or mic level.
Know how to properly wrap cables! Ask me in lab if you need a refresher.
Audio Terms:
- ADR (Automated Dialog Replacement) - The process of replacing dialog and sounds in post-production.
- Compressors - Used to reduce the dynamic range (loudness) creating a more consistent level. This is useful for dialog and narration. Compressing the dialog can make it easier to mix it in with music and other audio elements.
- Foley - Named after Jack Foley, the term is used to define the process used to re-create sound effects during the post-production phase.
- Pop-filter - Stops the letters B, P and T from "popping". (Typically a thin piece of fabric.)
- Proximity Effect - Sounds closer to the microphone have an exaggerated low frequency response. (Part of the reason radio announcers sound so "bassey" is because they are talking right into the mic.)
- Wireless receivers - Diversity have two or more antennas. Non-diversity have only one.
Jim's Audio Production Tips:
- Plan time in your production schedule for sound design.
- Editing - Focus on first making a "radio edit", which is focused on the soundtrack (dialog, music, SFX, etc.). This creates a foundation that you can edit to. Audio is important for motivating edits.
- Keep it legal! - Make sure your soundtrack has legal integrity. Using unlicensed music willl prevent you from entering festivals, being shown on TV, and getting screened in festivals. If you need background or thematic music use your Killer Tracks account.
Recording:
- Lavaliere and shotgun/hyper-cardioid are your "go-to" microphones in video/film production. Get your microphones close to or on your subjects.
- Use wireless microphones only with good reason.
- Monitor your recording with good headphones (enclosed are useful for loud environments). Make sure your levels are in the proper range. Listen for popped Ps or Ts, and any other distortion.
- Don't use AGC unless you have no other option (shooting breaking news, covering a fire, etc.).
- When shooting B-roll or any video, always record audio- even if you don't think you need it.
- DSLR/film shooters: When recording non-synched sound with a separate audio recorder always slate or clap to establish a sync reference.
- On location, always record 30-60 seconds of ambient audio with the same microphone(s) you are recording with. (Called room tone.) This can be layered into the soundtrack during post. If you need to add dialog to a scene, you’ll have the room tone to lay under it.
- When scouting shooting locations listen. Is it quiet enough? (vehicle noise, construction, etc.)
- Are you recording a person in the field and also recording voice overs? If so, use the same microphone.
FYI The Production Lab has the following tools which might be useful:
- Mic stands (& C stands)
- microphones
- field mixers
- field recorders
- slates
Timeline Techniques - Audio:
Be sure you know how to do the following:
Adjust levels for consistent audio- Some had inconsistent audio levels in their Interview/Feature stories or audio tracks that were panned to one side. Your dialog and narration levels should be in the same range. Dialog should be panned center or mono (equal amplitude both channels).
Don't just trust just your ears, but use the audio meters to make sure all of your clips are at consistent levels. For example, you might use -14 as the average level for most dialog & narration. As you add or edit narration or interview clips, make sure the average level for these tracks is the same, -14.
Know how to Normalize - Have you ever had an audio track that even when boosted was too soft?
Demonstration file: (Too_soft).
You can fix bring up the low level with the normalize function. This adds gain, so keep in mind that this will also boost the noise.
Adobe Premiere - Look under the Clip menu: Clip/Audio Options/Audio Gain.
Use markers to edit video to the beat. Visual markers are really helpful for editing video to the music and also for editing audio. Make sure you know how to create clip markers. In Premiere, load your clip into the source monitor. You can play it (or have it paused) and pressing M will set a marker. You can also set markers in the sequence window.
Demonstrate file: (Elvis C - WFTEOTW).
- Adobe Premiere - The m key creates markers, but in the sequence and not on the clip. You can assign a key easily through the "Keyboard Shortcuts" menu (under the "Premiere Pro" top menu category). Look for "Add Clip Marker" and assign any available key to it. Once you've set up the keyboard shortcut you can select the clip, play it in real time, and tap the keyboard shortcut key to make clip markers.
- Avid Media Composer - Like Premiere, you can assign markers to a particular key. Go to the settings tab in the project window. Then click on the keyboard. This will show you the keyboard and whatever shortcuts are assigned. Use the "Command Palette" to assign marker creation to a key. (Drag & drop the command onto whatever key you wish to assign it to.) Similar to the other software you need to select the track you want to add markers onto, otherwise they will be placed in the sequence.
Timeline Techniques - Video:
Know how to check sequence settings, which can differ from the clip settings. In Premiere, look under the Sequence menu. It's good to know what your codec, frame rate, and pixel dimensions are.
Know how to add & delete tracks Just right click in any blank area on the left side of your timeline.
Linking and Unlinking tracks - You sometimes want to link or unlink tracks. Select the tracks and under the Clip menu, choose link or unlink.
Splt edits, also known as J or L edits. In Premiere, an easy way is to hold down the Option key, while dragging the start or end of the clip left or right. In Avid, this ican be accomplished by lassoing &/or trimming.
Match frame - Have a frame in your timeline that you want to find the original clip for? In Premiere, put the time indicator over the highlighted frame in the timeline and press the f key. Voila your clip will load into the viewer. (This also works in Avid) Also, if you want to locate the clip in its bin, place the time indicator over the highlighted clip and press the F key. Your clip should be shown in the Browser.
Vocabulary
- Audio perspective
- Diversity antenna (verses non-diversity antenna)
- Hertz (Cycles per second), Kilohertz
- Loudness
- Microphone - physical & electrical characteristics (Dynamic, Condenser, Ribbon, etc.)
- Phantom Power
- Polar pickup patterns (omnidirectional, unidirectional/cardioid, shotgun/hyper-cardioid, bi-directional/figure eight, etc.)
- Pop filter
- Proximity effect
- Room tone
Back to Jim Krause's P351 Home Page
