

Jim Krause | Classes | T584 Documentary Production
Introduction to Editing with Premiere
Resources:
- Adobe portal to Premiere Tutorials: https://helpx.adobe.com/premiere-pro/tutorials.html
- Adobe keyboard shortcuts: https://helpx.adobe.com/premiere-pro/using/keyboard-shortcuts.html
- Adobe Premiere Pro 2022 Essential Training by Ashley Kennedy (LinkedinLearning)
- Getting Started with Premiere Pro for the Non-Video Pro by Richard Harrington (LinkedinLearning)
Media Workflow
A common mistake is to start editing by accessing footage directly from a media card, or from the downloads or desktop folder. This leads to media going offline and projects that can’t be shared or backed up.
Here are a few simple rules to setup and follow a professional workflow:
Rule #1: Have a dedicated place to store associated media and project files (NOT your primary boot drive or application disk).
- Work off a dedicated media drive. This could be an external solid-state drive (SSD) or hard disk drive (HDD). It should be a drive with fast read/write speed, dedicated for storing media and projects.
- For me, this is an external SSD drive that contains folders for video, graphics, and audio- and the project files. Having my project on an external drive means I can easily take it to another computer. If you work with both PCs and Macs, format your drive for ExFat.
- Create a folder structure for storing your media and associated project files. It’s good to have dedicated folders for audio, graphics, video, and project files.
- Before editing, name your project and save it to the dedicated media drive. (E.g., "Artist Profile.pproj").
- Set your scratch discs to be the same as your project.
Rule #2: Copy any media (video, audio, etc.) to the media drive BEFORE it is imported into the editing program. So, before importing and editing:
- Copy any project media into the proper folder on your media drive. After a shoot, copy the entire contents of an SD/CF card to an appropriately named folder on your media drive. (E.g.," Artist Profile September 12, 2022”) and then eject the SD/CF card
- Launch your edit software and use the Media Browser to link to your footage.
- Import and edit
Rule #3: Backup your media drive and all your files. Do this periodically. I backup my drives once a day.
Getting Started with Premiere - Assuming you’ve setup a proper workflow, let’s look at some tips and tools to make editing easier in Premiere.
Launching Premiere - Create a new project, give it a name, and save it into your media drive.
Check your Scratch & Media Cache settings
Scratch Disks: Premiere will write any new media (titles, processed effects, etc.) to the Scratch Disk. Check this by looking under the File menu (File / Project Settings). I like to keep mine “Same as Project” so the media Premiere is creating will go into my media drive.
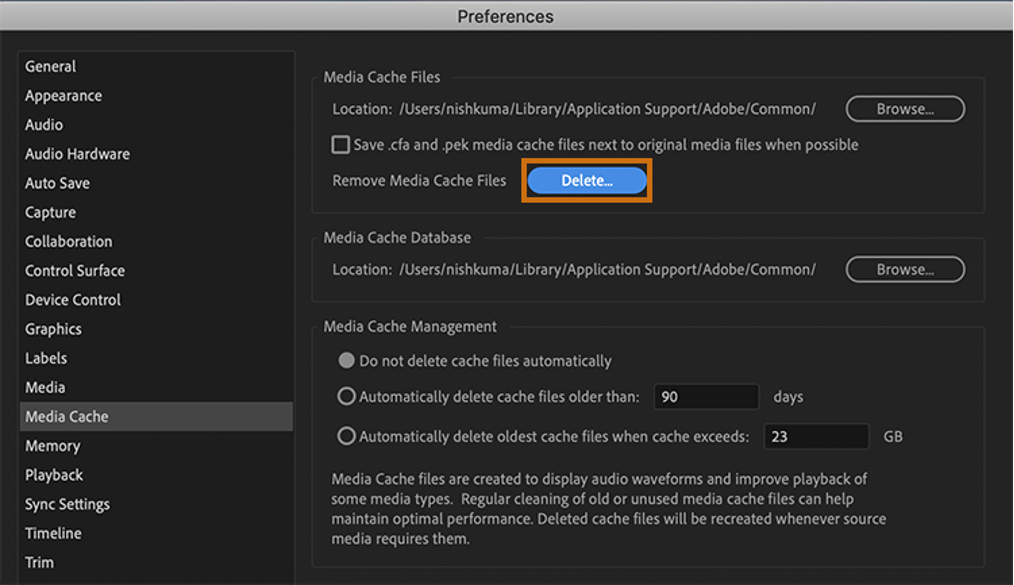
Media Cache: Premiere, Photoshop and After Effects all generate media cache files. These are temporary files (such as audio waveform displays, and previews) which build up over time- unless they are deleted. Many are unaware that by default, these are written to your bootup disk. If you don’t delete these periodically or move them to another location, they will fill up your drive and hinder performance.
To find this setting look under the Preferences.
Importing & Linking Media
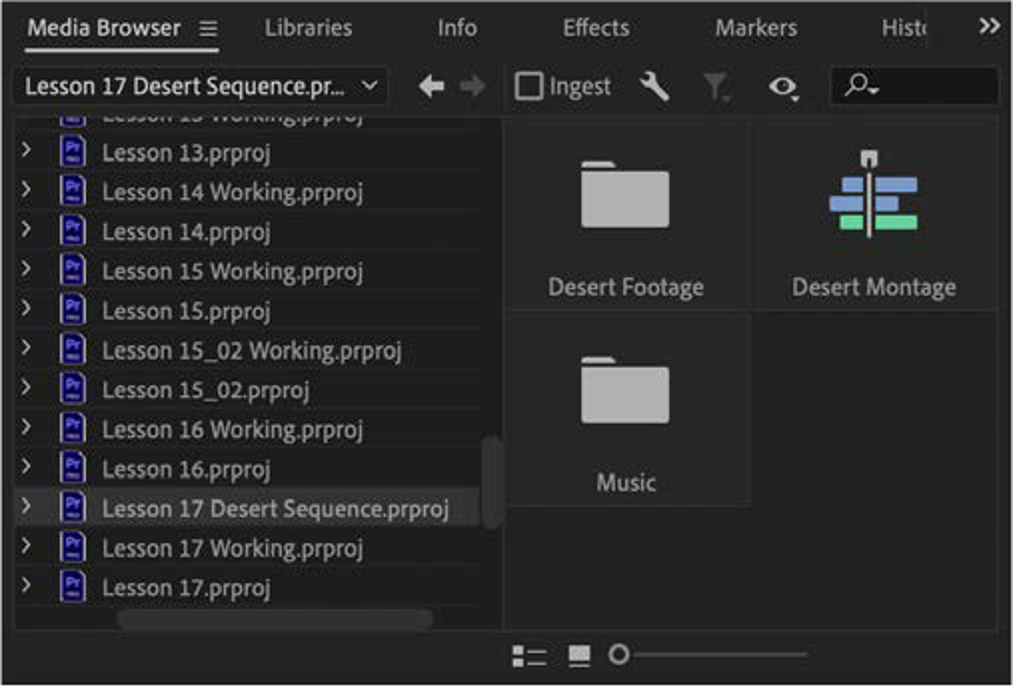
Once you’ve opened a project, you can import (Cmd or Ctrl + i) or use the Media Browser to navigate to media you wish to import. The Media Browser is good at accessing all the clips in folders created by various camcorders and DSLRs.
Once you’ve got media into your project, you’re ready to edit.
Creating a Sequence
You can create a sequence based on footage or make a new one from scratch.
To make a sequence based on the same codec, pixel dimensions, and frame rate as existing footage, right click the footage and choose “New Sequence from Clip”.
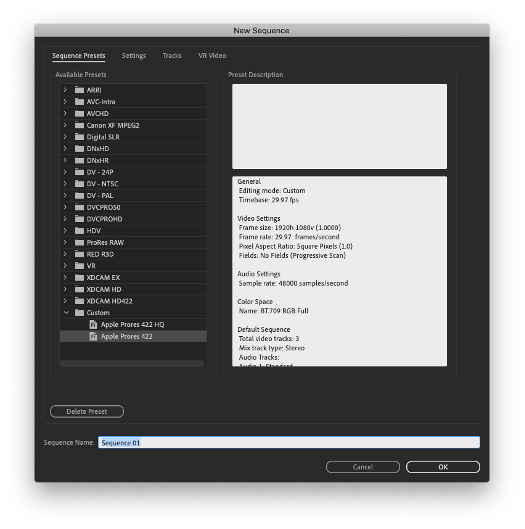
To create a new sequence from scratch press Command or Control N. Or you can select it under the “File” menu. It’s important to choose the proper pixel dimensions, frame rate, and codec. Don’t just use the one that Premiere offers by default.
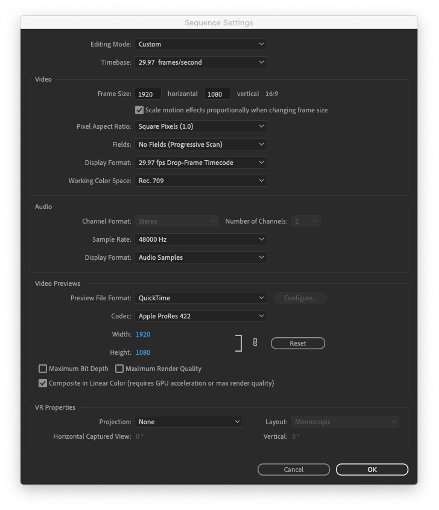
Once you create a new sequence, go to Sequence Settings (under the Sequence menu) to check it. You want to make sure that the pixel dimensions, frame rate, and codec are what you want.
 |
 |
|
|
Sequence settings – check or set these |
Editing
While beginners drag and drop clips into the timeline, experienced editors use keyboard shortcuts to set in and out points and to insert or overwrite footage to their timeline.
Below are some essential keyboard shortcuts. Once you start using these, your editing will become quicker and more efficient. (Link to Adobe keyboard shortcuts) Many of these also work in Avid Media Composer, Final Cut Pro, Davinci Resolve, and Sony Vegas)
- J, K, L Play backwards, Stop, Play forwards. Tapping multiple times will increase the playback speed. (TIP: Also works in QuickTime player)
- I = Set in
- O = Set Out
- Opt + X = Clear In/Out
- , (comma) = Insert
- . (period) = Overwrite
- + = Zoom into timeline
- - = Zoom out timeline
- V = Select Tool
- P = Pen Tool
- C = Cut tool
- S = Snapping on/off
- Up arrow = Go to previous edit point
- Down arrow = Go to next edit point
- Left arrow = go back one frame
- Right arrow = Go right one frame
Of course, the Cmd/Ctrl + X, C and V will Cut, copy and paste.
And my favorite shortcut of them all is Cmd/Ctrl + Z = Undo.
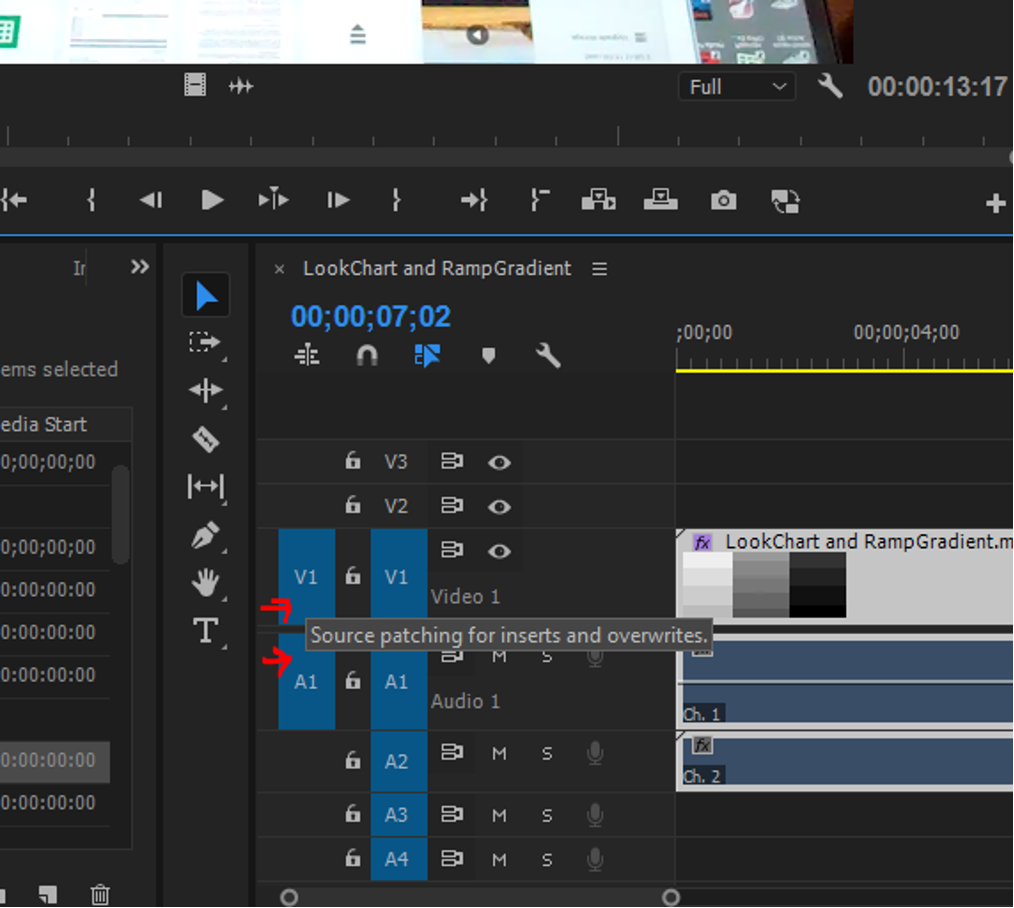
Source Patching and Track Selection Buttons
The buttons on the left show available source tracks of whatever media you have selected. You can turn these off and on and drag them to target tracks (called patching). The buttons on the right turn off and on (record enable) target tracks.
Black
All television and film projects must start and end in black. While the display will show black if there is no media, this is not actual black. To create black footage, right-click in the project window or a bin and select “New Item/Black Video”. This will create black media that you can use at the beginning and end of your project- and anywhere else you need black.
Simple Exporting in Premiere
When you want to export your sequence, first check to make sure the Work Area spans the length of your sequence, or alternatively, set in and out points (I and O) at the beginning and end of your sequence. (Did you remember to start and end your sequence in black?)
Cmd/Ctrl + M will take you to the export window- or click on Export in the top left workspace setting.
Give it a unique File Name- and choose a location that makes sense and that you have permission to write to (E.g., your media folder).
You can choose a preset from the left-hand categories or choose “Match Source – Adaptive High Bitrate”. While there are lots of formats to choose from, you can use H.264 if you want to create a file suitable for playback in class or YouTube or Vimeo.
Underneath the Preview window, check to make sure your preferred range is selected (Work Area or Source In/Out).
Click on the Export button
Check your media file
Back to Jim Krause's T584 Home Page
