Jim Krause | Classes | P354 Program Graphics & Animation
Week 6
Agenda:
- Look at artwork
- After Effects (animating text, track mattes & audio)
After Effects (continued)
Review
- Masks - Creating with shape and pen tools
- Text - text layer tool
- Fading to black (Can use a Black solid on the top layer)
- Nesting comps & Pre-composing (solves many complex AE challenges)
- Setting a work area (B & N)
- Rendering out work area or length of comp
- Trimming layers
- Making Layer markers (Press the asterisk key on the numeric keypad)
Masks
Be sure you know how to create masks with the shape tools and the pen tool. Can you add vertices? Can you convert vertices from linear to bezier? Can you animate over time?
Tip: To close a mask that's open first select the pen tool and click on the last end point of the mask. Then click on the starting point.
Typography
How can you get text into an After Effects composition? Here are three basic ways., each with its own merits:
- Photoshop: You can use the text tools in Photoshop, then import your work into After Effects. This is quick and easy if you have existing Photoshop files. Remember to import Photoshop files as compositions if you want to retain layer positioning. When you do this, AE imports text layers as bitmapped graphics. So if you scale up the text, it will become pixilated. However, right-click on the text layer in the AE timeline and choose Create > Convert to Editable Text. It will create a new editable text layer. Another good option is "Convert to Shape", which converts the text into modifiable (not editable) vector art.
- After Effects: There are several ways to generate text in After Effects. In the tool palette, select the text tool to create a new text layer. This is a straightforward way to make animated text for credit rolls, lower thirds, or paragraphs of text. Note that the text blocks can be re-sized using the drag handles, just like in Photoshop. After Effects also provides the option of converting text into shapes, which can then be animated in interesting ways.
- Illustrator: Adobe Illustrator provides very precise control of stroke, fill, kerning, leading and other type-related parameters. Perhaps the greatest benefit is that Illustrator lets you convert fonts into vector artwork using the "create outlines" command. How many times have you been working on a document on one computer and opened it on another to find that the font is missing? When you convert the font to vector artwork using the "create outlines" command you can take it with you wherever you go.
Creating outlines from text in Illustrator:
- Create a new document the size of your text block. Start with "Basic RGB and use either points or pixels, as they are interchangeable. It doesn't have to match the proportions of a TV screen, but should be sized to hold the entire block of text you'll be working with. For instance if you were making a long credit roll for DV, you might want to make document that is 720 x 7000 pixels in size.
- Use the text tool to define the text block and type or import your text, paying attention to tracking, leading, kerning etc.
- To modify your text, you'll want the Character Tool (COMMAND T), which should also give you the Paragraph Tool (OPTION COMMAND T).
- You also might want to assign a stroke and fill. You can modify these colors later in After Effects. (The "Change Color" effect is an easy way to do this.)
- After you are satisfied, save your Illustrator file so that you can go back and make changes later.
- Select your text with the selection (arrow) tool so that all the text becomes highlighted. Then choose "make outlines" from the drop down menu (SHIFT - COMMAND - O). This will turn your text from a font into vector artwork.
- You can make crop marks by using the rectangle tool to define the area that contains the text. Then choose "make crop marks" from the drop down menu. This will turn your rectangle corners into crop marks and define the part of the image that will be imported into After Effects.
- Save your new file (make sure you don't write over your first one)
- Import into AE. Since the text is imported as a vector graphic, it will scale very nicely.
Making Rolling Credits
After Effects is an ideal tool for making rolling credits. Before starting out you have to decide where in the workflow the credits will be composited or mixed over the video: either within After Effects (in which you'd need the finished video) or in the editing program (in which you'd supply the credits output with an alpha channel). The second option is usually best , since video editors are often having to edit the underlying video.
Assuming you want to make a credit roll file to give to an editor,follow these basic steps:
- Start out with a tall comp to place your text into. (If you were making this for 1080i broadcast, you might want a comp sized something like 1920 x 20000 29.97 30 seconds long.) This tall comp simply provides you a way to see and edit your text.
- Create an output comp (E.g. 1920 x 1080) and nest the tall comp inside it.
- Simply animate the position (Y value) as desired.
- When you output your movie, you'll need a codec with an alpha channel, either the Animation codec or using ProRes 4444. Either way you need to select RGB+ from the video channels to render.
- Advanced tip: When outputting for interlaced formats you should render individual fields. To do this: In the Render Queue click on Render Settings and select "Render fields". For HD you want "Upper Field First".
Star Wars Opening - In-class Exercise:
- You will recreate the look and feel of the opening of Star Wars. Feel free to take liberties with the text, but try to re-create the font size, thickness, speed and angle of the wall of text. The rolling text also feathers off into the distance (as opposed to staying visible). Getting the right size and speed take a little finessing.
- Make this in 16x9 in an HD format (E.g. 1920 x 1080, 1280 x 720)
- Upload your completed Apple PreRes 422, MP4, or H.264 movie into the appropriate Canvas assignment. Please make sure it's called "starwars".
Thursday------------------------------------------------------------------
Typography (cont.)
Text Along a Path
Sometimes it's useful to have text follow a specific path. To do this:
- Start out with a text layer
- Add a mask or draw one with the pen tool
- Twirl down the Text layer until you see "Path Options"
- Under the Path drop-down menu, choose your Mask.
- Animate the First Margin
Experiment by making some text and trying various shapes.
Track Mattes
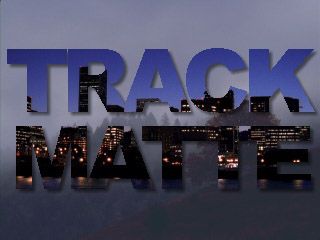
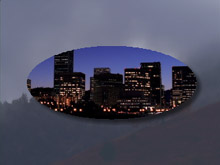
What is a matte? A matte is a layer or a channel that defines the transparency of that layer or another layer. (Like an alpha channel in Photoshop) Some like to think of it as a cookie cutter.
Track mattes need two layers to work. One layer acts as a matte or cookie cutter, the other layer provides the filling.
 |
 |
Track mattes can be
used to insert an image into a defined shape. For example you can
insert moving video into some text or the shape of an oval. |
|
To use Track Mattes, follow these three simple rules:
- Make sure you see your modes in the timeline columns.
- If you can't see the "mode - track matte" panel, then right click the top menu bar in the timeline. You will get a pop-up window. Select Columns -> Modes and your mode - track matte panel should appear in the timeline window. Alternatively, you can click on the arrow in the top, right-hand corner of the timeline to get the same thing.
- Place the matte layer (cookie cutter) directly above the layer that will serve as the fill.
- On the fill layer, set the track matte popup menu to use either alpha
or luma of the matte layer.
- Note that "inverted" is an option. Use this if you want to reverse the fill (fill outside the cookie cutter rather than inide it). Note that the matte (cookie cutter) layer will automatically have its visibility turned off.
Track Matte Exercise:
In this exercise we’ll superimpose a picture onto some text which will in turn move over another picture.
- Start a new D1 4 x 3 Comp: 720 x 486 29.97 fps, 15 seconds long
- Import two movies (from the Movies folder on your CMG CD or from AV zip or AV2 zip)
- Place both pictures in your timeline window
- Use a text layer to type in MATTE or a word of your choice. Set the point size to be big, about 225 or so.
- Make sure your solid/text layer is the top layer and that the movies are at the bottom
- Select the “switches/modes” button at the bottom of the time layout window to access the transfer modes.
- Experiment with the different track matte options for the movie layer. For instance, try to matte a picture into the text.
- Once you’ve mastered this see if you can figure out how to add
drop shadow to the text.
- Fine tune your track matte
- Add some audio.
- Render it out as an 720 x 486 Apple ProRes 422, MP4, or H.264 movie
- Make sure it's called "trackmatte"
- Upload a copy into the appropriate Canvas assignment (trackmatte)
Homework:
- Read/Work through Meyer book chapters 9, 10 & 11
- Animated text and video project - It can be opening titles, ending credits or even a political or inspirational message. Make it for HDTV (1920x1080) and at least 10-15 seconds long. Pay close attention to your text treatment and formatting- as this is the primary focus of the assignment. (In other words, don't just place text over some video- it should be done with care and thought. You might need to add additional background elements or some partial screening to serve as an appropriate background for the text. You might consider using a track matte to do this part.)
- Examples:
- Raquel Labrador's travel title
- Abi Yates' System Painter
- Audra Sapp's Hoosier promo
- Devoured by Jesse Grubb,
- Must contain video
- Must contain audio (don't forget to fade it out along with the video)
- Must have at least one track matte
- Must contain animated text, an animated text parameter, and video
- Turn in an H.264, MP4, or Apple ProRes 422 1920x1080 movie with an accompanying critique form, Be sure to identify how you used the track matte, and how you animated your text (along with the usual information).
- Turn in your proposal & script or storyboard for your your midterm project. Be sure to think about its purpose, overall length, duration of the various components and audio.


