

Jim Krause | Classes | P354/J560 Program Graphics & Animation
Week 14
Announcements/Reality Check:
- Final Project proposals are due today. Storyboards and any other preproduction work are due next week.
- Next Tuesday (12/10) we'll have the Final Quiz, worth 40 points. It is cummulative and will cover material from the first two quizzes (Use them to study) and the AE content we've covered since then. It will be administered through Canvas at the time of our regular lab time.
- Final Projects - Submit Final Projects to our Final Projects OneDrive folder and to Canvas before 10:15 AM Thursday, December 19. It will take the entire two hours to view everyone's projects and carry out Peer Critiques. Peer Critiques should be uploaded to our Final Project Peer Critiques folder on OneDrive. Everyone will have until 1 PM Friday, December 12 to make revisions based on peer feedback.
Agenda:
- Tuesday - Puppet Tool - Part 2
- Thursday - Rotating Portraits
[Review Work - Questions?]
Final Projects - The preproduction component of your Final Project (proposal and storyboard) is worth 10 points. You've already submitted your proposal. Next Tuesday is the deadline tor storyboards or other pre-production materials.- It is imperative that you add your own design flare. These projects must demonstrate your design skills and proficiency with After Effects.
- I will be looking to see if you've put design principles into use.
- Your Final Project must have legal integrity. Do not use images or sounds in your production that you didn't create or have the rights to.
- Projects must showcase the principles of graphic design. Utilize CRAP!
- On making movies dynamic. Use 3D layers, lighting and depth. Block animations in Z-space.
- Put time into laying out your text. Even a few simple words can be finessed with grace.
Puppet Fun - Part 2 (Meyer Chapter 35 - ZIP file of sources - 488 kB)
Resources & Tutorials:
- Adobe help: Animating with Puppet Tools
- How to make a zebra walk from Boone Loves Video (This is a good one and covers new Puppet Tools)
- New Puppet Tool for After Effects by Troy's View
- Animating the Overlap tool in AE by Angie Taylor
The puppet tool provides an easy to use way to animate layers, such as Illustrator or Photoshop documents. The layers must have non-changing alpha channels- so you need to use still objects. If you had a photo of a character you wanted to animate, you'd first have to separate the subject from the background. It could be saved as a PNG or TIFF with a transparent background, or simply as a cutout layer in a Photoshop document.
When you enable the puppet tool by placing a puppet pin on a layer, it creates an underlying mesh structure. It's good for getting organic-looking movement on layers.
The Advanced Puppet Tool has five kinds of controls. You can press Command-P to toggle through them. NOTE: There are two Puppet engines: Legacy and Advanced. The legacy engine (old school) only had 3 pins (Puppet Position, Puppet Overlap, and Puppet Starch). The advanced (new) tools work a bit differently. Some tools (starch) don't work the same way. You can choose between the modes in the layer timeline
- Position Pin - Use this to set basic control points
- Starch Pin - Use this to stiffen parts / add rigidity
- Bend Pin
- Advanced Pin - Newer version of the legacy Puppet Pin
- Overlap Pin - Use this to specify if pixels are in front of or behind other pixels
The motion paths created by the puppet pins can be changed or adjusted just like any other spatial keyframes.
Motion Sketching is an easy and straightforward way to add keyframes. If you hold the Command button down over a puppet pin a stopwatch appears. Then when you click and drag, it will record the keyframes. You can set the speed and other variables with the "Record Options" button next to the puppet pin tool.
The Overlap Tool allow you to set a value to areas that specify how they overlap other areas. Larger values cover (are in front of) lower values. It's possible to have negative values. Use minimal pins and adjust the extent value. You can even animate/change the overlap pin positions over time. WARNING - Unlike other pins, the Starch Pin will NOT automatically add keyframes. You must add these by twirling down the Mesh property and adding/animating ekyframes as needed.
The Starch Tool works a little like the overlap tool in that you can place a point and set the extent value. This will prevent the area from warping.
TIP: Before you start animating with the Puppet tool, move your time indicator to the first frame and set your initial starch or stiffness values. Also, for parts that are supposed to be in front of or behind other elements, set your initial overlap values.
Walking: if you want to animate a character walking (a bit of a tricky task) start by examining how a real person walks. You can then explore variations of the walk. Find a series of still images and use these to base your keyframes on. (Google Search: Human Walk Cycle Pictures)
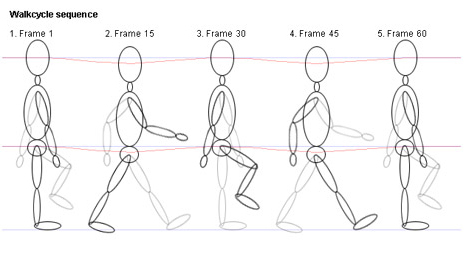
Basing your Puppet keyframes on the walk cycle will help. The example above has 4 different poses (the last is a duplicate of the first). You could make 4 sets of keyframes based on these- or based on any other sets of walk cycle pictures. Once you've got the groups of keyframes down, copy and paste the sets to repeat them. You can then precompose the layer and move it at a speed (matching the gate) across the floor.
Puppet Fun In-class Exercise (5 points)
NOTE: Extra credit points awarded to those who turn in good walking projects.
Watch the How to make a zebra walk from Boone Loves Video
Take any of the characters or objects from the book (or from anywhere) and animate them either walking or dancing to a soundtrack (something with a good beat- like in this example). Suggested pixel dimensions & length: 1280x720 at 10-15 seconds. If you have your character dance, be sure to use the Overlap Tool to make some part (arm, leg, etc.) be in front at one point in time and behind at another. (Don't worry about this if you are creating a walk cycle.)
Hint: You might want to set layer markers on the audio layer to help fine tune your character's rhythmic abilities.
To make this more dynamic, add another dimension (put it in 3D space). Try adding a floor and a light to cast shadows.
When you are satisfied, output an Apple ProRes422, MP4, or H.264 movie with sound called "puppet_fun" and upload it to the appropriate Canvas assignment.
Replacing Footage in After Effects: Have you ever created an animation, and then wanted to swap out one of the layers? You can replace footage in a comp by doing the following:
- First: In the timeline, select the layer name (so that its name is highlighted).
- Second: From the Project window, option-drag your replacement footage over the highlighted layer's name field.
Thursday --------------------
In-class 3D "Rotating Postcard" Exercise
The purpose of this exercise is threefold: to give you practice working in 3D space, to make sure you understand how to copy layers and keyframes, and to teach you how to replace footage.
You will create a virtual assembly line of pictures dropping in and rotating into different positions before leaving the frame. Below is an example:
Instructions:
- Find 4 images that are the same size and aspect ratio (Here are some you can use: Presidential Portraits)
- Start out with a 1920x1080 comp
- Import one of the images into the composition and make it a 3D layer
- Using 3D position keyframes, make it cycle through 4 different positions. (Hint: It helps to use precise intervals for your keyframes. In the example shown above, each picture stayed in its location exactly 1 second and took 1 second to move to the next position.)
- Take your time getting this first picture moving precisely right- as this is 90% of the work.
- Once you are happy with the first image, duplicate the layer 3 times (so you have 4 of the same rotating 3D layers)
- Stagger the layers uniformly in time (Hint: Press the U key to reveal all of the position keyframes. Move the layers in the timeline until the various position keyframes align properly.
- Use the replace footage trick (above) to swap out the layers with different images.
- Make sure the images don't overlap when they cross.
- Render out a full-size, ProRes422, MP4, or H.264 movie called "postcard" and upload it to the appropriate Canvas assignment.
Homework:
- Study for the Final AE Quiz, which will be next Tuesday.
- Thursday is a free work session. Work on your Final Projects!
