

Jim Krause | Classes | P351 Video Field & Post Production
Summer 2018 Week 4 - Wednesday
Lecture & lab this week:
- Tuesday - Art of the Short Story
- Screen & review Interview/Featue stories
- Production and editing techniques
- RGB/Color Difference - Color Sampling / Codecs
- Thursday - Free lab - Drama/Storytelling work session
Reality Check
- Final Projects are coming up next week. You should already have turned in a proposal. Your treatments are due now. I'd like to meet with each of you today (Wed) ot tomorrow (Thurs) to walk through your treatment with you. Scripts are due by Wednesday of next week.
- Please do not begin shooting unless you have met with me about your project and have turned in your pre-production materials.
- Drama/Storytelling projects:
- Storytelling teams:
- "High Spirits" Ryan, Yessica, & Nathan
- "Lost & Found" Kyle, Yinzi, & Kirsten
- "The Bloomingtonians" Sean, John & Tommy
- Storytelling teams:
- How is your planning coming along? (group status update) You should shoot these this week (Thursday) and leave the weekend for post-produciton. Give yourself time for sound design and for graphics and color correction. We'll look at these Tuesday - in one week. Your projects don't have to be long-but they should have a clear story, beginning and ending. Each team should have turned in one script (group grade). I expect everyone to have their own edit. You can work together to make a single team edit *if* you have a compelling reason to do so. You need to tell me this week if anyone plans to work together on the edit.
- Wednesday - Just a short lab to get geeky about encoding and to meet about Final Projects and learn the jib. You have the rest of the day to work on Drama/Storytelling projects
- Thursday - No lab - Storytelling production time.
Agenda:
- Storytelling
- Scripting
- Advanced Production & Editing Concepts
- Off-line / On-line editing
- Time code
- Review Interview/Feature Story projects. NOTE: Students must review and critique everyone's project (goes into the Peer Critique" IUBox folder. For each story write down a few things that are working and the weakest aspects of the production. Also note your impression and any advice. This will go into your In-class Critique grade.
Readings:
- Review cybercollege unit 16 (Waveform monitors and vectorscopes)
- Review cybercollege unit 57 (Understanding timecode)
- Review cybercollege unit 58 (Off-line and on-line editing)
The Art of the Short Story
Being able to tell a short story is essential to anyone with dreams of working on features. The short story has many virtues. Because it's short, it's relatively easy to produce especially when compared to a feature length film. The format is recognized by the Academy of Motion Picture Arts & Sciences. There's an Oscar for animated and live action short films.
Your upcoming storytelling projects are a way for you to experiment with the genre.
Thousands of years ago before the printed word, we used stories to entertain, warn about evil, and teach life lessons. Karma often comes into play in storytelling. Good triumphs over evil and those who are strong in character can beat those who are only strong in body (David and Goliath).
There are lots of good examples at Short of the Week.
- The Black Hole - short film with 1 actor and no dialog. Karma comes into play.
- Cake (Winner of Greensboro 48 hour film festival) Often breaks the 4th wall.
- Future Hero
- How They Get There (Spike Jonze short film) With no dialog this short reveals the reason for its title.
- Shattered by Carter Ross
- Shovel Ready (Winner of the 2010 48-hour film festival) Elements: Character: Marco or Muffin Gabbowitz, a person who works with animals, Prop: a horn
Line of Dialogue: "Do you think you can do that again?" - Sparks (Winner of the 2012 Campus Movie Festival)
- The Truth About Meeting Women
Point of View (POV)
What is the perspective or who is telling the story? Most films are told in the 1st or 3rd person.
- 1st person stories are told from the "I" or "we" perspective. (Carter Ross's "Shattered" is an example. Movies using the voiceovers to describe action from the leading character's perspective. "It was a hot afternoon in June, when she burst into my office.")
- 2nd person is told from the "you" or the reader's perspective. This is tough to pull off in fiction and not commonly done. It is common in non-fiction ("how to") programs & commercials ("You ought to fly United")
- 3rd person is told from the "they" or narrator's perspective. (Most common in film and documentary.)
Goals and Conflict - Essential ingredients
Trying to obtain a goal and the conflict characters encounter trying to reach it are the essential ingredients to storytelling.
The "aha" moment - A good story strings the viewer along and makes them curious as to solving the puzzle (Memento, Fight Club, ) or resolving the essential conflict. Sometimes just figuring out why they chose the title for a short is enough. How They Get There (Spike Jonze short film)
Story Structure
Stories have a beginning, middle and end. Usually we are introduced to the main charqacter and the essential conflict in the first act. Our character meets resistance in pursuit of the goal. We build up to the final confrontation, and then have resolution (happy or sad).
If you don't have an ending or resolve your story in some way you may likely not have a good story.
An interesting scenario is NOT a story:
A man wakes up in a rowboat floating on a lake.
There is no goal or objective- it's just a guy in a boat.
However- if you add a goal and some resistance to achieving it, you're on your way to having a story.
The man looks around - there are no oars or liefjacket, and the wind is picking up blowing the boat farther from shore. The camera pushes into a close-up and he is starting to panick. We dissolve to a flashback- a hazy memory of him nearly drowning because he can't swim.
Classic storytelling themes have been re-told countless times:
- Lovers who can't be together
- A dog or person trying to get home
- A boy battling a giant
Trying to obtain a goal and the conflict characters encounter trying to reach it are the essential ingredients to storytelling. Think how it was illustrated in examples of the above storytelling themes:
- Romes & Juliet - They were from feuding families, which prevented them from realizing their love.
- Incredible Journey - 2 dogs and a cat are lost hundreds of miles from home. They face all kinds of dangers as they try to get home.
- In Jack & the Beanstalk a small boy uses wit not strength to beat the giant.
Stories don't have to revolve around a person or an animal. It can be about an inanimate object.
- Cart - A film by Jesse Rosen
- Werner Herzog narrated a classic short about a plastic bag.
Terrible ideas / things to avoid:
Conflict by itself is useless. Two people fighting or racing without any idea as to their character or motivation is pointless and meaningless. Be careful with starting your short film by someone waking up (done about half the time.)
A one-way vector up or down does not make a good story as there is no opposing force or conflict.
Example: Slow decline to suicide - Say you have someone who is depressed because their boyfriend/girlfriend died. The slow decline down to being suicidal is also a bad story, as there is no opposing force (conflict), just a draw to the darkness. However the introduction of an countering force (E.g. hungry puppy who shows up) might be enough to bring about a re-appreciation of the value of life.
Framing, Blocking & Sequencing
TV and film rely on close-ups. Whenever you are at a storypoint where there is love, loss, discovery, pain, etc. you shold be showing it with a close-up. Close-ups also are useful for showing us objects that are important.
Hitchcock's rule: The size of an object in the frame should equal its importance in the story at that moment.
Many have a tendancy to open with a wide shot, as the importance of establishing characters in time & space is vital. However many times starting with a wide shot is not the most cinematic or interesting choice. Sometimes simply re-ordering shots in a sequence can make it stronger and change the meaning.
Sample 2 shot scene - A sharply dressed gal in a business suit is on her way to meet someone.
Version #1:
- MS girl walking down hallway
- CU low angle tracking shot of high heels
Version #2:
- CU low angle tracking shot of high heels
- MS girl walking down hallway
In version 1 we immediately see where we are and what's going on. The 2nd shot (CU tracking shot) provides the viewer with no more information except showing off her fashion sense. It also inadvertently brings into play "Hitchcock's Rule making us wonder how the shoes are important.
In version 2 we start with the CU high heels. This immediately poses the question of who they belong to and where we are. These questions are answered by the 2nd shot where we see who they belong to and where we are.
A good storyteller knows how to string along their audience.
Quick exercise: A man has an engagement ring in a small box that he plans on giving to his sweetheart. He is waiting for her on a park bench. Imagine you have just 3 shots to setup the scene, introducing the girl into the frame in the last shot. How will you approach this?
- Shot: _____________________
- Shot: _____________________
- Shot: _____________________
On framing action - the closer the camera is to the line of action and to your characters, the more depth you will have and more dynamic it will be.
Sugestions:
Simplify your story. The fewer characters the better. The less dialog the better. Find ways to visually get the point across, as opposed to relying on dialog. Use actors - not your friends.
Keep your storytelling projects short & sweet! It's much better to have 4 minutes of gold than 10 minutes of yuck.
A good goal is to always try to make the viewer wonder, "What's going to happen next?"
[Look at examples]
This is a perfect project to try our your cinematic creativity. Think creative lighting and camera.
Video Production Tips and Techniques
Pre-production
- Understand the point of your video. Why are you making it and why will a viewer want to watch it? Understand the context of how your video will be viewed.
- Keep the objective and target audience in mind when developing the treatment and then the script.
- Know the S.O.P. and conventions of the trade. These exist for a reason. This includes using conventional formats for proposals, treatments and the various types of scripts.
- On scripting non-fiction: See Jim's super secret (NOT) production planning form. Note the "ingredient list". These are the essential ideas that will be embedded into the video. Not all have to be verbally articulated.
- Technical: know your delivery requirements (E.g. 1080i ProRes).
- Graphics - Don't wait until after production! Plan your graphics along with your other shots and imagery. It helps to have a graphic style sheet that you will use
when making graphics. Just as you don't want to search for lost shots while
editing, you don't want to spend time pondering what graphics to have or what fonts to use during an edit session. Prepare graphics in advance. Do they have to be centercut safe?
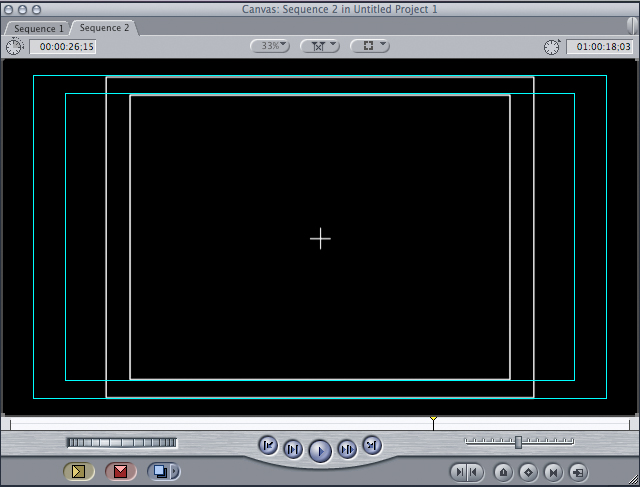
The image above shows a 4x3 centercut mask placed underneath FCP's 16x9 safe action and safe text guides. Many video cameras have a variety of viewfinder guides you can toggle through.
Here's a link to a 15-second spot that had to fit inside the 4x3 safe action and safe text areas:
- Plan, plan, plan...... There is never too much pre-production.
- For scheduling:
- Set time aside for color correction & graphics
- Set time aside for sound design and mixing.
- Larger projects require detailed production schedules. Consider
the most efficient way to shoot a production. It's typically not in the
order of the script. Shot sheets tell you what shots you need
at any given location. When you have multiple locations, talent, a crew and two trucks of people and gear to haul around, it's important to have a good production plan. Otherwise you're going to waste money and people's time. (not good)
Check out this example for a special episode of The Friday Zone, which was all about cicadas:
- Here's a link to the script. Note the scenes and numbers.
- Here's a link to the shooting schedule. Note the re-ordered scenes.
Production
- Camera check - Before shooting, make sure:
- Clear your camera & check recording format
- Gain and auto gain are off (should display 0db on the screen)
- Shutter is off and not in auto mode (should display 1/60 on the screen)
- ND filters are off (unless you want them)
- Iris & Focus in Manual mode
- Recording format, bitrate, and pixel dimensions are what you want.
- Don't forget to get releases from your talent.
- Establish your scene - We need to know where we are, what time of day it is, where objects and people are, and the layout of the space.
- Continuity & smoothness - Unless you have a good reason for doing so, follow the rules of continuity and use a tripod. Don't go handheld unless you stay wide and are a good shooter.
- Film Style - Repeat the action capturing it with different (cut-able) shots. Works great for fiction and non-fiction (capturing B-roll), especially when matched with continuity-style production.
- Rule of threes - When shooting think of three things: the shot we see right before the one you are about to take, what you are about to take, and the shot that will come immediately after.
- It's Art! - Try to make every shot well composed and interesting (a piece of art in itself).
- Think Deep Thoughts - To get the maximum sense of depth try composing your shot with 3 distinct layers: foreground, mid-ground and background. If you're shooting an establishing shot of the exterior of a building, you can setup the camera with something in the forgeound (E.g. branch). You can also frame strong lines so they lead into the frame as opposed to perpindicular to it.
- Be shallow - One of the most definable traits of film is it's shallow depth of field. You can get the most out of small format cameras by using a large aperture (small f-stop) coupled with a telephoto (larger focal length). If there is plenty of light turn on the ND filters. This will let you use a smaller f-stop.
- Warm things up - Slide a warming card into your camera case. Warming cards are slightly blue. When you white balance on one you trick the camera into shifting the hue just a little. They make everything look a little rosier (warmer). Alternatively you can cool things down (tint blue) by white balancing on a slightly warmer/rose-colored card. Sure you can color correct in post, but this saves rendering.
Normal white
Warming WB card
- Get a move on - Move the camera or move the subject. Dollies require a lot of gear and setup time. Often the move we need is only a few feet. Small jibs and sliders offer an inexpensive, simple, and effective solution. Slide rails are inexpensive, transportable, and provide an easy way to move a camera in one direction. They can also get into places where a dolly can't (E.g. on a tabletop). Small jibs can provide both horizontal and vertical movement. Small video cameras and DSLRs are lightweight enough to use the inexpensive variety of a Steadicam (without the counterbalanced/articulating arm). Even a monopod has enough weight to stablize a very light video camera. For these to be most effective you want to setup your shots with foreground, mid-ground and background elements.
- Slider clips (start about 1:20 in)
- Life in Haiti (Canon 5D + glidecam slider)
Lighting - Except for shooting B-roll in run & gun situations, always plan on lighting your subjects. A portable LED light with a small stand is easy to pack with your camera gear.
Audio - Mic your subjects appropriately. The Canon XF405 camcorders record excellent digital audio. You don't need a separate audio recorder. In terms of how to mic, I've found there are two basic approached:
- Interviews & narration should be close mic'ed (lavalier or any closely positioned microphone).
- Storytelling projects should take audio perspective into account (how far the sound source is from the microphone). This often results in using a shotgun microphone and varying the distance to match the camera position.
Room tone - The audio channels in your timeline should always have something in it - as almost all spaces have some amount of ambient noise. This includes, fans, air conditioners, electronics, outside background noises, etc. When shooting at any given location always record 30-60 seconds of "room tone." This gives you audio filler materials to use in your editing timeline to bridge gaps between exchanges in conversations, or to cover while someone is not talking.
Post-Production
- Apple Final Cut Pro or Avid? http://vimeo.com/22029233
- Practice, practice, practice - Know your editing app and become comfortable and proficient using it.
- Sound Design - Audio is perhaps the most important but often overlooked production element. Come up with a strategy to make sure your soundtrack is well designed and adds to the art & effectiveness of your production.
- Get consistent audio levels (ADL - average dialog level is about -20 for broadcast on PBS. -12 is a good target for non-broadcast.)
- Sometimes it's good to give scenes a distinct look, such as when illustrating dreams or flashbacks. Plug-ins are 3rd party software modules that function within a host
application. Once you purchase the plug-in
package and install it, you'll find the effects accessible through
the standard video and audio effects menus within the host application. Boris Continuum Complete offers a wide assortment of
effects for video editing and After Effects (making cool light waves, fire, extruding text, etc.).
- Red Giant (Magic Bullet Looks) is a set of visual "looks" that can be used with Avid, Premiere & Final Cut Pro.
- Magic Bullet Looks - promo
- Magic Bullet Looks - Before & After video
- Kaia "Traveler's Prayer" music performance video shot with a Canon C300 and a Canon XF305. I used Magic Bullet to help get a consistent look and feel from two different cameras shooting under variable lighting conditions.
- Red Giant (Magic Bullet Looks) is a set of visual "looks" that can be used with Avid, Premiere & Final Cut Pro.
- Graphics - Spend time finessing these. Come up with a graphic treatment
- Use colors and fonts that mesh with your content.
Basic Color Correction & Finishing
Color correction is the process of enhancing the visual appearance in regard to hue, saturation, and contrast.
Be sure you know how to perform basic color correction in whatever software you use.
Premiere
- Lynda - Ashley Kennedy on What is Color Correction and Color Grading (7 min)
- Lynda - Ashley Kennedy - Cverview of Premiere's color correction tools (8 min)
- Color correction in Premiere using the Fast Color Corrector. (4 min)
- Adobe Premiere Color Correction with a Vectorscope (4 min)
- Using an adjustment layer in Permiere to corect GoPro footage (4 min)
- It is possible to copy & paste effects from one clip to another: Lynda video tutorial
- How to Edit Fast in Premiere Pro (5-minute Youtube video)
Lut - Stands for Look Up Table. Here's a short clip explaining how they work.
Sadly, applying effects to a group of clips is a weakness of Premiere. One can copy and paste attributes but this is klunky.
To make your sequence broadcast-TV ready
- Use drop frame timecode
- Must be closed-captioned
- Make sure all video levels are in the legal broadcast range (0-100 IRE for digital, 7.5 - 100 IRE for analog).
- Make sure audio is within the legal broadcast range
- Include 30-60 seconds of Color Bars at the start of your sequence (with the 1kHz tone at the appropriate level such as -20 dB)
- Slate (important production info including: title, date, producer, running time & audio format, etc.)
- Black (approximately 10 seconds or optional countdown)
- Program start time of 01;00;00;00
- Black video tail at end
Useful resources:
------------------------------------------------------------------------
RGB (true component) verses the Color Difference System
*Color difference signals are one way to break down the information in a video signal. (Other ways include composite video, Y/C or S-Video, and RGB.) The color difference signals can be expressed as R-Y, B-Y or Cr, Cb or sometimes U, V. This color difference signals are used in the digitizing process. What the heck is a color difference signal?
Color difference signals: TV uses an additive color system based on RGB as the primary colors. Mix red, green and blue together and you get white, right? Well if the RGB data were stored as three separate signals (plus sync) it would take a lot of room to store all the information. Fortunately some great technical minds figured out a way pack this information into a smaller box (figuratively speaking) devising a way to convert the RGB information into two new video signals that take up less room, with minimal loss in perceived picture quality. The color difference signals and are typically represented by UV or Cr Cb. So when you see YUV it is referring to Y (luminance) and UV (the two color difference signals).
Combining the RGB signals according to the original NTSC broadcast system standards creates a monochrome luminance signal (Y). So you can basically pull out the blue and red signals and subtract them from the total luminance to get the green info.
Video Codecs
Interframe (GOP) verses Intraframe
Only the highest end video is uncompressed. Almost all video (especially HD) uses some sort of compression. When looking at the characteristics of various video recording gear, it's important to understand the basic differences between two general types of compression.
Most standard definition production tv codecs use some type of intraframe compression. This is where we take each individual frame and squeeze it so it all fits onto tape or disk. Examples of intraframe codecs include:
- Apple ProRes
- Avid DNX_HD
- DV
- DVCProHD
- Panasonic D5
However many new HD recording formats use interframe (GOP) compression. The important thing to understand about interframe compression is that it compresses over time as well as space. In intraframe compression we divide the picture into smaller rectangles called macroblocks. These macroblocks are compressed and tracked over time and placed into a GOP (Group of Pictures) Examples of interframe codecs include:
- HDV (MPEG-2)
- XDCAM (MPEG-2)
- MPEG-4
- H.264
MPEG-2 is a popular interframe codec. It is very efficient and scalable. One can make frame dimensions in varying sizes (720 x 480, 1440 x 1080 etc.). The down side is that GOPs can be a bit more taxing on GPUs to edit. Deconstructing the GOPs during the edit process tasks the computers to a greater degree than intraframe codecs.
Off-line & On-line
Traditionally one of the purposes of off-line systems were to create EDLs that could be brought into higher-end on-line systems. The first non-linear editors (D Vision and early Avids) were sophisticated off-line systems that could not only generate an EDL, but let the editors work with VHS like quality. With advances in technology non-linear editing system got steadily better, and today off-the-shelf PC or Macs are capable of editing on-line video.
Timecode
Timecode is a numerical code embedded into media, which allows for synchronization and frame accurate control. Timecode allows us to label and access a specific frame or location in the media stream precisely and with frame accuracy.
Timecode is formatted like a 24 hour clock HH:MM:SS:FF.
"Hours" range from 00 to 23, "minutes" range from 00 to 59, "seconds" range from 00 to 59, "frames" ranges from 00-29.
Hours
Minutes
Seconds
Frames
23
59
59
29
While we think of video running at 30 frames per second basis, it actually runs a tad slower: 29.97 frames per second. This 3/100ths of a second difference every second adds up and can cause timing issues if misinterpreted.
There are two ways to count or number timecode (which can be set on the camcorder, edit software, or digital recorder):
- Non-drop frame often referred to as "NDF"
- Drop frame often referred to as "DF" (The industry standard for delivering TV shows.)
Non-drop frame timecode: each new frame of video is given the next higher number. (06:01:00:29 becomes 06:01:01:00)
The problem with NDF timecode is that it's based on 30 frames per second, while video actually runs at 29.97 frames per second. The displayed timecode will drift from the actual elapsed running time of a program.
Drop frame timecode is a little trickier to count, but provides a numbering system that is more accurate, timewise.
How does it work? In drop frame time code, the frame numbers 0 and 1 are removed from each minute except for every tenth minute (starting from the first).
Minutes 00, 10, 20, 30 and so on, do not skip frame numbers, but all other minutes do.
You can tell when something is drop frame because the time code display has semicolons (;)
- 06;01;00;29 becomes 06;01;01;02
- 06;09;59;29 becomes 06;10;00;00
What happens if you use the wrong timecode?
Scenario: It's your first TV job and they've asked you to assemble two-hours of content for broadcast (exactly 120 minutes). Easy eh? Simply start at timecode 00:00:00:00 and add content until you reach 02:00:00:00.
If you used NDF timecode your 2-hour program would run over and by about 7 seconds!
Be sure to use DF for broadcast!
Explanation: Look at 2 hours of programming:
- 2 hours x 60 minutes = 120 total minutes.
- 120 minutes x 60 seconds = 7,200 total seconds
If you used NDF timecode, the time would be based on 30 fps:
- 7200 seconds x 30 frames = 216,000 total frames.
But if you used DF timecode, it would take the true speed into account of 29.97 fps, not 30.
- 7,200 x 29.97 = 215,784 total frames.
There's 216 frames difference - or about 7.2 seconds.
Timecode calculators:
Apps for iOS:
On-line calculator:
Vocabulary (Know and be able to define these terms)
- Audio normalizing
- Audio sweetening
- Broadcast Safe levels
- Color bars
- Color Correction
- Color Grading
- Interframe (GOP)
- Intraframe
- LUT (Look Up Table)
- Off-line
- On-line
- Plug-in
- Room tone
- TBC (time base corrector)
- Timecode - drop frame (DF) vs non-drop frame (NDF)
- Vectorscope
- Warming card (for WB)
- Waveform Monitor
Back to Jim Krause's Summer P351 Home Page
