

Jim Krause | Classes | P351 Video Field & Post Production
Week 11
Announcements / Reality Check ------------------
- Moving Camera Lab this week.
- Your drama groups pre-production work is due by the start of Wednesday's lab. This is a group grade. Be sure to submit one packet with everyone’s name on the cover sheet.
- Your production packet can contain the following:
- Cover page with everyone's names, title, date, etc.
- Revised treatment
- Script
- any other pre-production materials (storyboards, prop list, shot list, etc.)
- As a reminder, the Spring 2022 Drama groups are
- AM Lab:
- “Chess Match” with Zach, Neil, & Ethan
- “Funny Bunny” with Teeka, Abby, & Stas
- “Panic” with Amanda, Kirsten & Ashlyn
- PM Lab:
- “Living with Depression” with Marie, Ethan, Ethan, & Nikki
- “Haunted House” with Duke, Ibrahim, & Owen
- “Love, Kinda, Not…” with Eden, Barakaeli, & Audra
There will be NO lab next week (4/6) so the groups can focus on finishing their Drama/Storytelling Projects.
We'll look at completed projects during Week 13 (4/13)
You should also be preparing for your Final Projects. We'll share FInal Project ideas this week in lab. Your final project proposal and treatment are due next week. I would like to meet with all of you individually to discuss your Final project. Final Projects are due by or before Week 15.
Editing 202 --------------------
Terms
- Color Correction is the process of fixing lighting, exposure, and color temperature inconsistencies. This is done before grading. It's also done to make sure that video and audio levels are "broadcast safe".
- Color grading is the process of enhancing the visual appearance in regard to hue, saturation, and contrast. This is where one might give a "look" to a scene or entire movie.
- Lut - Stands for Look Up Table. Here's a short clip explaining how they work.
- Broadcast Safe - Used to refer to video with audio and video levels that are compliant with broadcast requirements. Video levels generally should fall between 0 and 100 IRE.
Here's a cool before and after example of color grading:
Color Grading demo - Dallas Video Production - Crooked Path FIlms
Vectorscopes & waveform monitors
When shooting video we are primarily concerned with framing, focus, color balance, and exposure. When editing we can't do much to fix bad framing and focus, but we can make adjustments to luminance and color. We can also make changes to the audio, mixing tracks, changing volume and equalization, and applying effects.
To do this, one needs a way to objectively monitor and assess video and audio signals. While it's possible to use Media Composer's or Premiere's built-in waveform displays, editing software isn't ideal for this. There's limited real estate on screen and editing software is optimized for editing, not monitoring. Ideally, one would have an external broadcast reference monitor and waveform and vectorscope display.
Waveform monitors and vectorscopes are vital tools, especially for color correction and color grading.
Video signals can be broken down into two components: luminance (Y), which you can think of as brightness, and chrominance (C), which is the color component.
We typically use waveform monitors to look at the luminance (brightness) component (though they can also look at the chrominance) and vectorscopes to examine the chrominance component. These are available in most popular editing platforms (Premiere, FInal Cut Pro, Media Composer, Vegas, etc.).
Waveform Monitor - The part of the scale for broadcast legal video starts at 0 IRE and goes up to 100 IRE (IRE = Institute of Radio Engineers). One f-stop translates into about 20 IRE units. The major settings to be aware of are:
Digital (ATSC) black should register at 0 IRE. 0 IRE is the lowest legal luma value for broadcast. This is where the blackest blacks will register.
The brightest elements shouldn't be over 100 IRE on a waveform monitor. 100 IRE is the highest legal luma level for broadcast.
Premiere Resources
- How to Read Lumetri Scopes in Adobe Premiere Pro by Jason Boone
- Adobe Premiere tutorial on using the Waveform monitor (Creative Cow - 7:30)
- Here's a 4-minute tutorial on basic color correction in Premiere.
- Here's another 4-minute tutorial on Adobe Premiere Color Correction with a Vectorscope.
- Using an adjustment layer in Premiere to correct GoPro footage (4 min)
- How to Edit Fast in Premiere Pro (5-minute Youtube video with a collection of tips)
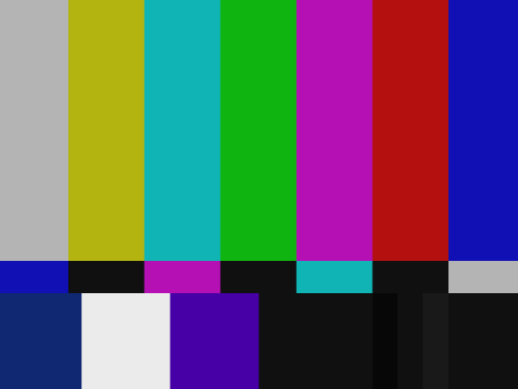
Color Bars are electronic reference signals generated by cameras or post-production equipment. When shooting, it's always good practice to generate color bars and to include them in your footage. They are most useful to caibrate monitors both in the field and in the edit room
Below is an image of SMPTE color bars.
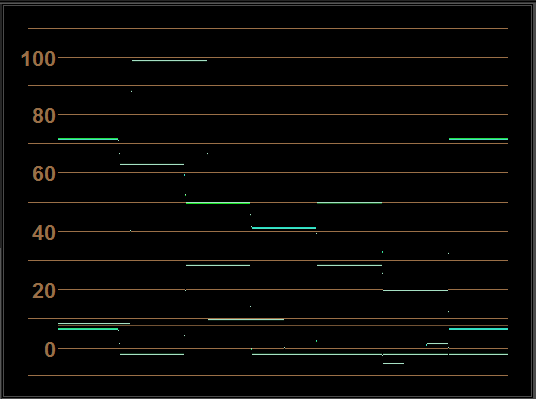
Here's what they would look like on Premiere's waveform monitor:
Vectorscope - A vector display measuring device that allows visual checking of the phase and amplitude of the color components of a video signal. They are especially useful when used with color bars, as the display face has targets that show both proper phase and saturation.
The I line (in-phase)
The I line is also known as the skin tone line. It's the diagonal line running from the top left to the bottom right (where there's a -I label). All skin tones should fall along this line.

FCP, Premiere, and Media Composer provide built-in waveform monitors and vectorscopes. This provides a good way to check levels when color correcting, grading, or adding graphics.
Setting up HD sequences in Adobe Premiere
Some have made the mistake of accidentally or unknowingly down converting their footage in Premiere, mainly because they used the DV sequence preset (which seems to load by default on our lab computers).
Assuming you've shot in HD, it's usually best to change your sequence setting to match your clip settings. When you drop your first clip into your sequence you might see this:
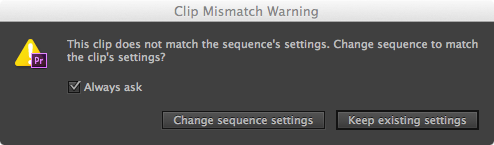
If so, then click on "Change sequence settings". This will set your sequence to match your source footage.
That said, a few good codecs to use for HD broadcast work include:
- Apple ProRes
- XDCam EX (HQ)
- AVCHD (not anamorphic)
Know your Bitrate and Data Storage Needs
Codecs have varying storage requirements, dependent upon bitrate and pixel dimensions. For example, one hour of 25 Mbps 1080i HDV footage might fill 11-12 GB of storage, while one minute of 1080i Apple ProRes 422 HQ (about 220 Mbps) could take about 10 times as much- about 112 GB.
A data rate calculator is a great tool for this. With a data rate calculator, you can plug in the codec, pixel dimensions, and frame rate, and it will tell you what the storage requirements for any given duration will be. AJA makes a good app, AJA DataCalc, which is free and available for both IOS and Android systems.
- Link to AJA DataCalc (IOS version from iTunes App store)
- Link to AJA DataCalc (Android version from Google Play Store)
For HD TV broadcast (1920x1080), you usually need 35 mbps for minimal news/documentary productions. Going to 50 mbps is great, but only if you have fast media access (like a RAID) and lots of availble storage. If you work with multiple streams of HD video, 4K, or want to work with higher quality codecs you likely need external storage - plus additional storage for backups.
- B&H Photo Video has an article on external drives that is worth a read.
Timeline Techniques - Audio:
Be sure you know how to do the following:
Adjust levels for consistent audio- Some had inconsistent audio levels in their Interview/Feature stories or audio tracks that were panned to one side. Your dialog and narration levels should be in the same range. Dialog should be panned center or mono (equal amplitude both channels).
Don't just trust just your ears, but use the audio meters to make sure all of your clips are at consistent levels. For example, you might use -14 as the average level for most dialog & narration. As you add or edit narration or interview clips, make sure the average level for these tracks is the same, -14.
Know how to Normalize - Have you ever had an audio track that even when boosted was too soft?
Demonstration file: (Too_soft).
You can fix bring up the low level with the normalize function. This adds gain, so keep in mind that this will also boost the noise.
Adobe Premiere - Look under the Clip menu: Clip/Audio Options/Audio Gain.
Use markers to edit video to the beat. Visual markers are really helpful for editing video to the music and also for editing audio. Make sure you know how to create clip markers. In Premiere, load your clip into the source monitor. You can play it (or have it paused) and pressing M will set a marker. You can also set markers in the sequence window.
Demonstrate file: (Elvis C - WFTEOTW).
- Adobe Premiere - The m key creates markers, but in the sequence and not on the clip. You can assign a key easily through the "Keyboard Shortcuts" menu (under the "Premiere Pro" top menu category). Look for "Add Clip Marker" and assign any available key to it. Once you've set up the keyboard shortcut you can select the clip, play it in real time, and tap the keyboard shortcut key to make clip markers.
- Avid Media Composer - Like Premiere, you can assign markers to a particular key. Go to the settings tab in the project window. Then click on the keyboard. This will show you the keyboard and whatever shortcuts are assigned. Use the "Command Palette" to assign marker creation to a key. (Drag & drop the command onto whatever key you wish to assign it to.) Similar to the other software you need to select the track you want to add markers onto, otherwise they will be placed in the sequence.
Timeline Techniques - Video:
Know how to check sequence settings, which can differ from the clip settings. In Premiere, look under the Sequence menu. It's good to know what your codec, frame rate, and pixel dimensions are.
Know how to add & delete tracks Just right click in any blank area on the left side of your timeline.
Linking and Unlinking tracks - You sometimes want to link or unlink tracks. Select the tracks and under the Clip menu, choose link or unlink.
Splt edits, also known as J or L edits. In Premiere, an easy way is to hold down the Option key, while dragging the start or end of the clip left or right. In Avid, this ican be accomplished by lassoing &/or trimming.
Match frame - Have a frame in your timeline that you want to find the original clip for? In Premiere, put the time indicator over the highlighted frame in the timeline and press the f key. Voila your clip will load into the viewer. (This also works in Avid) Also, if you want to locate the clip in its bin, place the time indicator over the highlighted clip and press the F key. Your clip should be shown in the Browser.
Applying effects to an entire sequence or a particular section - There are many reasons why you might want to apply an effect to an entire sequence or just to a section. For instance, you might want to add a color treatment and a vignette to give a flashback or memory a dreamy look.
- Adobe Premiere - Add an adjustment layer over the footage to be affected. You can apply effects to the Adjustment Layer, which will leave the footage below it unaffected.
- Avid Media Composer - Add the effect to a filler video track directly above the selection (it works like an adjustment layer).
- Apple FCP - Nest your edited sequence into another, and apply the effect to the new sequence.
Legal Concepts Media Makers Should Know ---------------------------------------------
As producers, videographers, or editors, it's important to understand the basics of intellectual property law.
Intellectual Property (IP)
Work of the mind is known as Intellectual Property, often abbreviated as IP. The essential idea behind IP law is that once someone creates something (a story, song, painting, invention, etc.) their idea is protected by law.
Copyright Law protects the authors of intellectual property from other people profiting from their work. The first Federal Act was passed in 1790. It has been modified and elaborated upon over the years. It falls under the Library of Congress.
What does it protect? It protects ideas that can be represented in a tangible form (books, songs, artwork, choreography, etc. You can find out more here. How long does it last? Find out here.
IP law can be divided into several categories.
- Inventions and devices can be patented.
- Logos can be trademarked.
- Music, poetry, film, dance and other creative works can be copyrighted.
Fair Use - The legal concept of Fair Use addresses exceptions- when it's OK to use other people's IP in your own work. This usually falls into four areas: education, commentary, news, and comedy/parody.
Fair Use Overview <- Watch this!
Public Domain - Copyright has expired.
Legal contracts - There are three types of legal contracts you should be familiar with:
- Model/talent/photo Releases
- Location Releases
- License Agreements
Model/Talent Releases: These agreements outline the conditions of which the talent will appear in a program. In order to be legally binding, they must specify a time period (duration) and some form of compensation.
Location Releases: These agreements outline the conditions of which a certain location is used in a program.
License Agreements provide for the limited use of someone else's copyrighted material (intellectual property). Anything that has been created, written, composed etc is given some level of protected by Federal copyright law. Music is usually the easiest thing to procure a clearance for (most TV & radio stations have blanket licenses with BMI and ASCAP). Prints, photos, paintings & other visual items are much trickier.
Insurance -----------------------------
Liability - This is the basic insurance all videographers should have if they are doing professional work. Everyone needs liability insurance in order to drive a car, as it protects against accidents. The same is true for video/film shoots. It protects againsts accidents and accidental damage.
E & O Insurance - Errors and Omissions insurance is a "catch-all" type of insurance that protects against many legal issues (libel, slander, invasion of privacy, copyright infringement, etc.). All producers creating televised TV shows or programs which will be theatrically released should have this.
Vocabulary
- Color bars
- E&O insurance
- Fair Use
- IP (Intellectual property)
- Liability insurance
- License Agreement
- Normalize (audio)
- Off-line editing (editing by proxy)
- On-line editing
- Releases (license, location, model, etc.)
- Sync license
- Vectorscope
- Waveform Monitor
