 |
T436 Fall 2012 - Week 5 Readings: Blain Brown, chapter 14 "optics and focus" & chapter 15 "set operations" Cinema Reports this week: (Mon 9/17) Evan - Chapter 5 - Visual Storytelling & (Wed 9/19) Eumi - Chapter 6 - Cinematic Continuity Lighting Assignment from last week - We'll look at these on Wednesday. Please be sure to both post it on your blog (or vimeo, yuoutube, etc) and write or post a critique. Place an Apple ProRes 1080i HQ version saved as your username in the T436 dropbox! I need to make sure everyone knows how to edit (or at least output) in the right pixel dimensions, frame rate and codec. Email list, facebook group & virtual callout t436-l@list.indiana.edu: I've created a listserv for T436 talent and added YOU to it. In order to send an email out to the list, you must send it from your IU email address. Send your emails to t436-l@list.indiana.edu . Usually, the Producer (though sometimes the Director) will make requests for talent and extras with the list. Also, please join the facebook if you haven't already. I'm trying to move crew-talent communications to the listserv and facebook group. Protocal for making talent requests with the list: Be polite, clearly identify the role(s) you are looking for, briefly describe the project (you can point them to an on-line script or treatment), and let them know when you need them (outline your rehearsal/shooting schedule). Remember they are volunteers. Virtual Callout - Please encourage interested talent to send me an email to join the listserv and also to join the facebook group: Small Screen Cinema (T436). Producers need to start producing! Bump schedule back a week? The production team (discuss major roles and how projects are produced)
Set operations, slating and set procedures Agenda/Reality Check:
Lab this week is the last rotation exercise. Next week we begin production. Follow up on last week's zone system lighting exercise. (sample image) Notes: The production schedule is online. I'll be continuously updating it. If there is a particular role or project you want to work on, please let me know. Otherwise, I'll assign people I think are most qualified. We have lots of willing talent accessible via our listserv and the facebook page. Check in on writing teams and producers/crew for Week 2 productions. Update schedule. As you revise scripts make sure that the characters behave rationally and have believable motivation. Keep it as simple as possible. Avoid dialog when possible. If you structure and tell your story right, you will make the viewer want to watch and keep asking "What will happen next?" Remember to name and indetify your scenes. Unless a scene (or shot) has a specific purpose (develops story or character, serves as an editing aid, etc.) then it should not be in the script or shot list. Note on scene fragments: Make sure you output the specified type of Quicktime file. Thinking creatively as a DP Not all are ready to DP or Direct. Fortunately, not all have to. But as cinematography students, each of you should have the ability to block a scene and come up with an artful way to shoot it. Some of you are thinking more creatively/artistically than others. Think beyond capturing your subject with good framing, focus, and proper exposure. That is the stuff of basic photography. Strive to maximize the"art" within the frame. How you place the subject within the environment is significant. How the character moves and behaves is also important. Capturing a small detail, or something that reflects the mood of the scene or character can help tell your story. Lead us into the scene and show us what's significant with close-ups. Viewers want to see how the characters respond to whatever is key in the scene. Let viewers savor these moments. Conclude each scene as carefull as you would finish a story. A few basics that people often overlook:
What makes film look like film? Why does video sometimes not look like film?
Some of you know about continuity / film style shooting
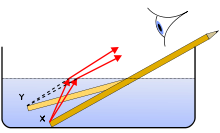
Wednesday we'll review audio and slating procedures before sending you off on the rotation exercise. Journal/Blog - Starting next week, everyone needs to start updating their weekly journal or blog. Please update them at least on a weekly basis. Have this ready for me every Monday. Document your experiences for the projects you are working on. While these can be informal (I won't be counting off for slang/grammer/spelling etc.) please try to clearly identify your role and what specific production(s) you are working on and what challenges you encountered. This is important since you will be working in a variety of roles for different pieces at the same time. These journals will be key to help you write your production summaries and critiques. Conclude your weekly journal entry by including how many hours you spent working on the various projects. (Simply list the project followed by the estimated weekly hours.) Chapter 14 optics According to Michael Minnock, all objects must do 2 out of 3 things:
Most objects do not emit, but reflect and absorb. Objects appear to be certain colors becuase they absorb certain wavelengths (colors) and reflect others. Angle of Incidence - This is the measure of a line or ray relative to a perpindicular surface. (given in degrees). Example: If you are looking directly into a mirror your angle of incidence is 90 degrees. Reflection: The angle of incidence (I) equals the angle of reflection (R)
Refraction: bending of light as it passes through two different transparent substances / enters a different medium.
Mathematics of optics (We won't be going into this too much.)
The basic optic formula is
Focus - (Distance from optic center to focal plane or target.) In considering how focus works think beyond a - dimensional focal plane. The lens refocuses the image into 3-dimensional space. The focal plane is a 2-dimensional plane that happens to intersect it. Changing the focus shifts the 3-dimensional image forwards and backwards through the Principal Plane of Focus. Depth of field extends beyond and behind the actual point of focus. Objects that precisely line up with the focal plane are said to be in critical focus. What appears sharp is called apparent focus. You can shift the focus a little and it still looks sharp. This difference between critical focus and apparent focus (which we can not usually detect) is called the circle of confusion. In other words, the circle of confusion is the fudge factor that we have on either side of the plane of critical focus, where the image still appears sharp. Depth of Field (DOF) The portion of the 3-dimensional image falling on the target image plane that is within the circle of confusion is the depth of field. Factors that affect the apparent DOF include: Focal length
Hyperfocal distance (In optic formulas it's referred to as HD.) According to Brown this is: "the closest focus distance at which both objects are at infinity and closer objects are in focus.”Because of the circle of confusion, there is a focal fudge factor. Objects outside of the principle plane of focus still appear to be in focus.
DOF charts - The ASC book has a very useful set of focus charts. They specify the exact DOF given an f-stop and focal lengths. They are grouped by image target size (16mm, 35mm, 70 mm, etc.) Macrophotography Most lenses can not focus on anything closer than a few feet from the camera. Chapter 15 set operations Set etiquette I like a quote in Douglas Hart's book, the Camera Assistant:
The Director is in charge. If a question or issue arises, the Director shall have his/her way. The DP works tightly with the Director. He/she is second in command after the Director. Except for the Director & DP, no one should interact with the talent unless their job directly necessitates it. (Audio engineer getting levels, etc.) They need to be given privacy and space so that they may focus on their roles. It's a good idea to not even look at them as they are involved in a scene. The crew should not distract the Director either. Don't touch the camera unless you are the DP or are on the camera crew. Don't touch the lights unless you are the DP, gaffer or on the electrical crew. Don't stand in front of the camera. When crossing the path of the lens, say "crossing" Don't take pictures - especially flash pictures unless OK's by the Director
or DP. When taking flash pictures on the set, say "flashing". Set & Slating Procedures Slating
Notes (audio engineers - pay attention to this)
Procedures - Review procedures in book (p 254). We'll be using a modified version due to our minimal crew:
|
|
.png)
|
|