 |
T436 - Fall 2012 - Week 3 Exposure & Image Control Covers topics: lighting basics (Brown chapter 7) Next week chapters 10, 11, 12 & 13 Wed Lab Agenda
Jim's Notes (based on watching your Week 1 fragments) On framing action - the closer the camera is to the line and your characters, the more depth you will have and more dynamic it will be. Quick exercise: Two characters meet and exchange dialog. How will you approach and frame this? For the scene fragment exercises please don't focus on effects, music and filters. The shots and sequencing are what's important. It's fine if you want to add effects and music, but don't make them your primary focus. Everyone seems to have a tendency to open with wide shots. Re-think this. One goal is to make the viewer wonder what's going to happen next. Simply re-ordering the shots in a sequence can make it stronger and change the meaning. Sample 3 shot scene (a sharply dressed gal in a business suit is going to meet someone:
In version 1 we immediately see what's going on. The 2nd shot (CU tracking shot) provides the viewer with no more information except showing off her fashion sense. It also inadvertently brings into play "Hitchcock's Rule making us wonder how the shoes are important. In the last (aha) shot we see that she is going to an appointment behind the door. In version 2 we start with the CU high heels. This immediately causes the viewer to wonder who they belong to and where we are. These questions and then answered by the 2nd shot. The last (aha) shot we see that she is going to an appointment behind the door. On how to be cinematic:
Stories - We can opt to produce longer stories or fewer stories with more planning and production time.
The essential ingredient - Many know that conflict (challenge or struggle) is the essential storytelling ingredient. Many make the mistake of interpreting this to mean there should be violence. I want to steer clear of familiar themes and unmotivated/unnecessary violence – especially to women. Also violence as a central theme is discouraged. These are cheap devices most frequently used by newcomers. Characters- People are expected to act rationally and believable. If the characters don’t follow the rules it can be intriguing, but must be explained. Character summaries - This is something often used in theatre scripts which is very useful. Treatment structure- Know the proper formatting. For longer form (movies) be sure to use an act structure and be sure to identify (label) them in your treatments. For short form (what we’re doing) you should name (label) your scenes clearly specify when and where they are taking place. Let's hear which stories were your favorites. Review from last week / chapter 4, 5 & 6 Language of the Lens (chapter 4) The Lens & the Frame - Need to know how to add layers of meaning and nuance with our tools. Lens Perspective - Know what is "normal". For 35mm it's about 50mm. We can go greater (E.g. 100mm) for a narrower field of view or smaller (E.g. 20mm) for a wider field of view. Deep focus - Everything is in focus (for a reason). Manipulating perspective (Aquarium scene in Lady From Shanghai or Gandolph and Frodo in the LOTR) Selective & Rack Focus - Know basic rules for the focus puller:
Visual Storytelling (chapter 5) Visual Metaphor (convey meaning greater than contents of frame) Using Light Lighting as a story element - Examples (knowledge in Citizen Kane, lights in The Natural) analyzing pictures and scenes from a movie A good exercise is to analyze pictures from magazines and scenes from movies. WIth just a little thought, it's easy to determine placement and quality setting mood (high key, low key, placement, quality) Cinematic Continuity (chapter 6)
The Prime Directive
The Line Can be established with actors, gestures, objects and actions Can move and must be continually re-addressed According to Brown, Screen Direction "gives the audience clues about the story and helps keep the audience from getting confused about where someone is or what they're doing."
Occasional exceptions: when character positions are locked and established (E.g. in a car) Cuttability 20 percent rule. The image must change by at least 20% for it to be cut-able.
6 types of cuts:
lighting basics (chapter 7) Goals of Good Lighting:
Know Lighting Terminology on pages 108-109. Aspects of Light:
Know the difference between upstage verses downstage lighting (similar to narrow vs broad). In upstage lighting the key is upstage of the camera (just like in narrow lighting - the key is on the opposite side from the camera). Practicals - Real life lighting instruments appearing on set. They are best used with a dimmer. Lighting Sources (chapter 8) Tools of Lighting Daylight Sources:
HD Cinematography (chapter 9) HDTV & SDTV Analog vs Digital Know waveform monitor & IRE units (0 - 100) Camera Sensors: Major parts of video cameras: lens, beam splitter, CCDs/CMOS, & viewfinder While it might be possible to find a camera with 3 CMOS sensors (Sony's DCR-PC1000 for example), most use one. This permits the camera to function without the need for a beam splitter. CMOS sensors use less power than CCDs. CCD and CMOS sensor sizes Most sensors are made in different sizes such as 1/4", 1/3", 1/2", and 2/3". Some of the new HD video cameras use larger CMOS sensors that more closely match standard film sizes such as 35mm. This allows DPs to use their existing collection of 35mm lenses and attachments. Consumer cameras usually have only one pickup device or three very small CCDs. (1/4" for example.) As the price and quality goes up, so does the size of the CCD. Professional studio cameras generally have larger CCDs. (The Canon HLX1 uses 1/3" CCDs while the Grass Valley cameras in Studio 5 use 2/3" CCDs.) Lens mounts are standardized and matched to the corresponding CCD size. (You'd use a 2/3" lens mount with a camera with 2/3" CCDs.) The bigger the lens mount, the bigger the CCD and the more room for more pixels. Generally speaking, bigger is better and the more pixels a CCD or CMOS sensor has on it the higher the resolution or detail that can be delivered by the camera. Video Latitude (dynamic range) Video signal Experimental broadcasts began in the US in the late 1930s. The NTSC was established in 1940 and came up with the first set of standards in 1941. Called for 30 frames per second with 2 fields. 4:3 (1.33) aspect ratio came close to matching existing 16mm and 35mm film formats, which used the Academy Aperture (11:8 or 1.375 aspect ratio). On a cathode ray tube (CRT) display, the image is created by an electron beam, which excites phosphors on the face of the screen. The electron beam scans each row from left to right, and then jumps back to draw the next line. The excited phosphors on CRT displays decay quickly after the electron beam makes its sweep. Because of the decay, images displayed at about 30 frames per second, presented a noticeable flicker. In order to reduce the flicker, the display frequency had to be increased. To achieve this, the frame was broken down into two fields. The first field displayed only the odd lines while the second displayed only the even lines. So instead of drawing approximately 30 frames per frame, interlacing uses two fiel People began to want color TV. In order to broadcast in color, the original NTSC standard for B & W television had to be revised. NTSC updated it in 1953. Creating the new standard was no easy task as engineers had to make color broadcasts backward compatible with the large base of existing black and white televisions. (10 million sets had been sold by 1949.) To do so, engineers split the signal into two components, luminance, referred to as luma, which contained the brightness information, and chrominance, which contained the color. The color information was encoded onto a 3.58 MHz subcarrier added onto the video signal. Black and white sets could ignore the color subcarrier using only the luma portion, while color sets could take advantage of both. Unfortunately, the color subcarrier interacted with the sound carrier creating minor visible artifacts. In order to reduce interference, the field refresh rate of 60 Hz was slowed down by a factor of 1000/1001 to 59.94 Hz. So instead of running at 30 frames per second, broadcast television downshifted to 29.97 frames per second. Composite video signal
HDTV A number of industry associations, corporations, and educational institutions formed the Advanced Television Systems Committee (ATSC) in 1982. The ATSC is a not-for-profit organization that develops voluntary standards for advanced television systems (www.atsc.org). Such advanced systems include enhanced analog TV, digital TV (DTV), standard definition TV, high-definition TV, and data services. The ATSC’s published broadcast standards are voluntary unless adopted and mandated by the FCC. In December 1996, the FCC adopted most of the standards proposed by the ATSC, mandating that broadcasters begin broadcasting digitally. According to the ATSC, within one year of the November 1, 1998 rollout, more than 50 percent of the US population was in a position to receive digital broadcasts. During a transitional period, television would be broadcast both digitally under the FCC’s digital terrestrial television (DTT) guidelines and through traditional analog means. At the present time, Congress has voted to terminate analog broadcasting by February 2009, though the deadline could be extended. Standard definition television (SDTV) can use either the 4:3 or 16:9 aspect ratios, HDTV always uses the 16:9 aspect ratio.
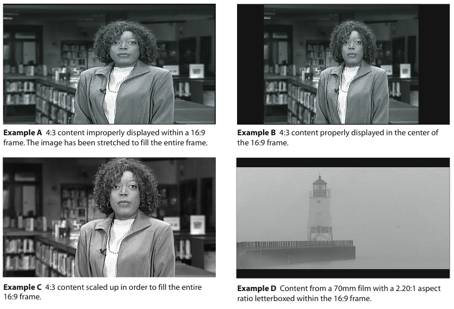
While HDTV content is designed to fill a 16:9 frame, the display of programming from other sources with varying aspect ratios is also possible. Programs shot in the 4:3 aspect ratio or in wider, cinematic formats can easily be displayed inside of a 16:9 frame without distortion by shrinking the image. Unfortunately it’s quite common to see broadcasters delivering images with the improper aspect ratio (Example A of figure 2.3). Traditional, 4:3 content is ideally viewed on widescreen displays by presenting the image as large as possible, centered within the frame. (Example B) This is sometimes referred to as pillar boxing. This allows the original image to be seen as it was intended. Some broadcasters magnify the 4:3 image so that it fills the entire 16:9 frame. (Example C) This can often be identified by the lack of headroom. Content from cinematic formats with wider aspect ratios can be accurately displayed within the 16:9 frame with letterboxing. (Example D) It’s also frequently necessary to present widescreen programming inside of traditional 4:3 displays with letterboxing.
Color Computer-based digital imaging systems typically operate in an RGB color space or a variant of it, while broadcast video transmission adopted a color difference model. This was not only because the signal had to be compatible with existing black and white televisions but it also had to take up as little bandwidth as possible. Video cameras capture images into an RGB color space via three CCDs or CMOS (complementary metal oxide semiconductor) sensors. Initially captured in uncompressed form, the RGB values are processed and converted into a color difference mode. In the color difference system, the color signal can be numerically represented with three values: Y, B-Y and R-Y. Mathematically, Y represents the value of the luma portion with B-Y and R-Y representing the two color difference values. The formulas used to derive the color difference values vary depending upon the application. YPbPr uses a slightly different formula optimized for component analog video, while YCbCr uses a different scaling factor optimized for digital video. Humans are more sensitive to spatial detail in brightness than in color information. Because of this, most of the important detail needed to comprehend an image is provided through the luma portion of the video signal. Engineers found they could throw out more than half of the color information and still get pleasing results. Compared to RGB, Y,B-Y,R-Y can store color data in a smaller amount of space and thus use less bandwidth when broadcast. Color Sampling Unless working in an uncompressed RGB mode, the color signal is converted into a color difference system. After converting the RGB, the signal is sampled, quantized, compressed (usually), and then recorded to tape, hard drive, optical disk, or in some cases a memory card. Color sampling figures convey the manner in which the luma and color components are sampled for digitizing and are typically presented as a ratio with three figures (x:x:x). The first figure is usually four and refers to the number of luma samples. The second two figures correspond to the number of samples for the two color difference signals. For instance, DV’s 4:1:1 states that for every four luma samples, only one sample is taken for each of the color difference samples. A 4:2:2 format (such as DVC Pro50 or digital Betacam) means that for every four luma samples taken, two samples will be taken of each of the color difference signals. A 4:1:1 format would record half the color information that a 4:2:2 format would. When a codec is represented by a 4:4:4, it is typically referring to an RGB signal. The 4:2:0 color sampling format comes in a few different variants. As usually employed in MPEG-2, the color difference signals are sampled at half the rate of the luma samples, but also reduced in half, vertically. While formats using lower color sampling ratios require less bandwidth, those with higher sampling ratios are preferred for professional editing, keying and compositing.
|
||||||||||||||||||||||||||
|
|